
Why this matters
Google Tag Manager is the layer that sits between your website and every tracking tool you use. Install it correctly and you can deploy GA4, Google Ads conversion tracking, Meta Pixel, and more without touching your site’s code every time. Set it up sloppily and you will spend months chasing phantom data. This guide covers the correct way to install GTM, how to structure your account, and the naming conventions that keep things readable as your tag list grows.
Prerequisites
- A Google account (the same one you use for Google Analytics or Google Ads is fine)
- Access to your website’s HTML, or a developer who does
- Admin access to your website’s CMS if you are using WordPress, Shopify, or similar
- Basic familiarity with what a tag is (a snippet of JavaScript that sends data somewhere)
Step 1: Create your GTM account and container
Go to tagmanager.google.com and sign in with your Google account.
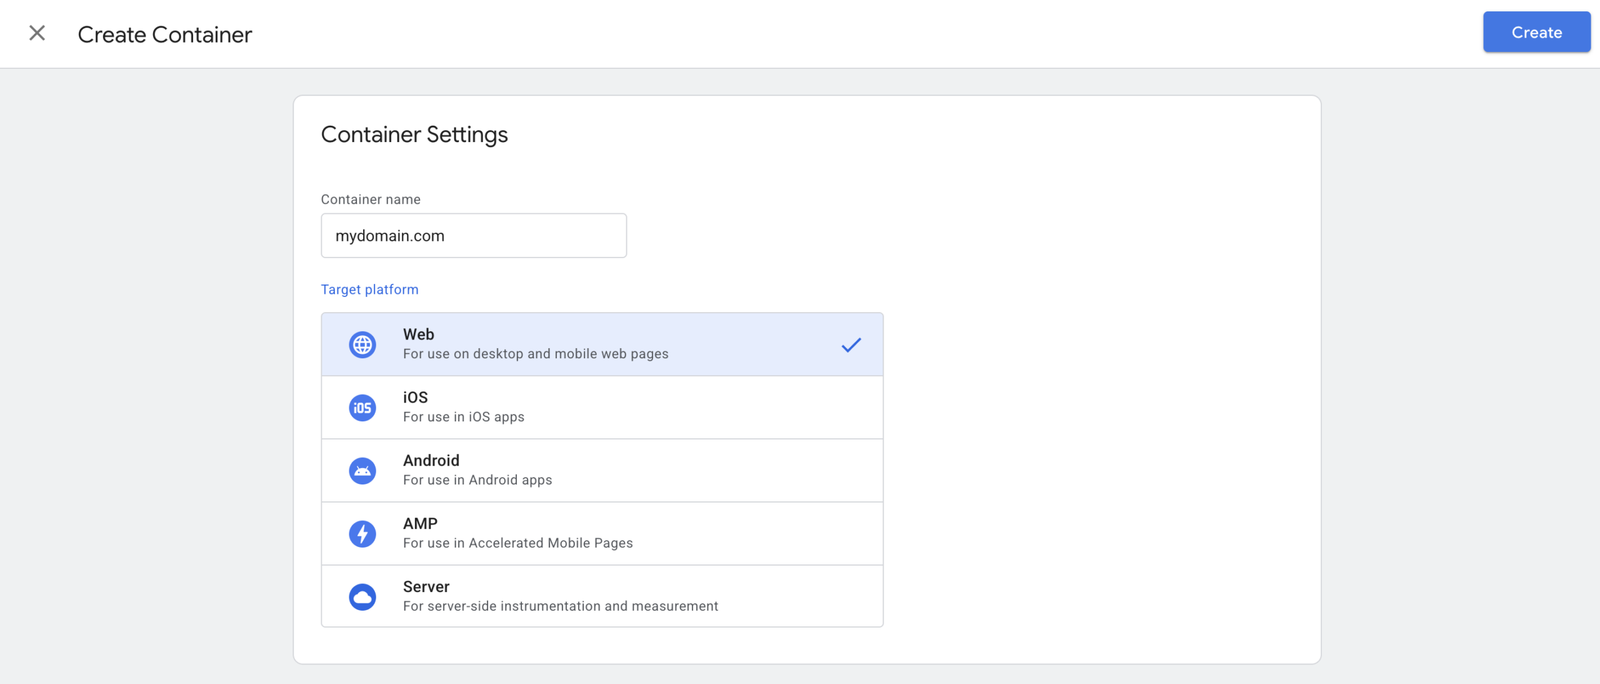
- Click “Create Account.” Each business or client gets its own account. Do not put multiple unrelated websites under the same account.
- Name the account. Use the business or client name. Keep it clean, no abbreviations that will confuse you later.
- Create a container. A container maps to a single website (or app). Name it using the domain, such as
rykeranalytics.com. Under Target Platform, select Web. - Click Create and accept the Terms of Service.
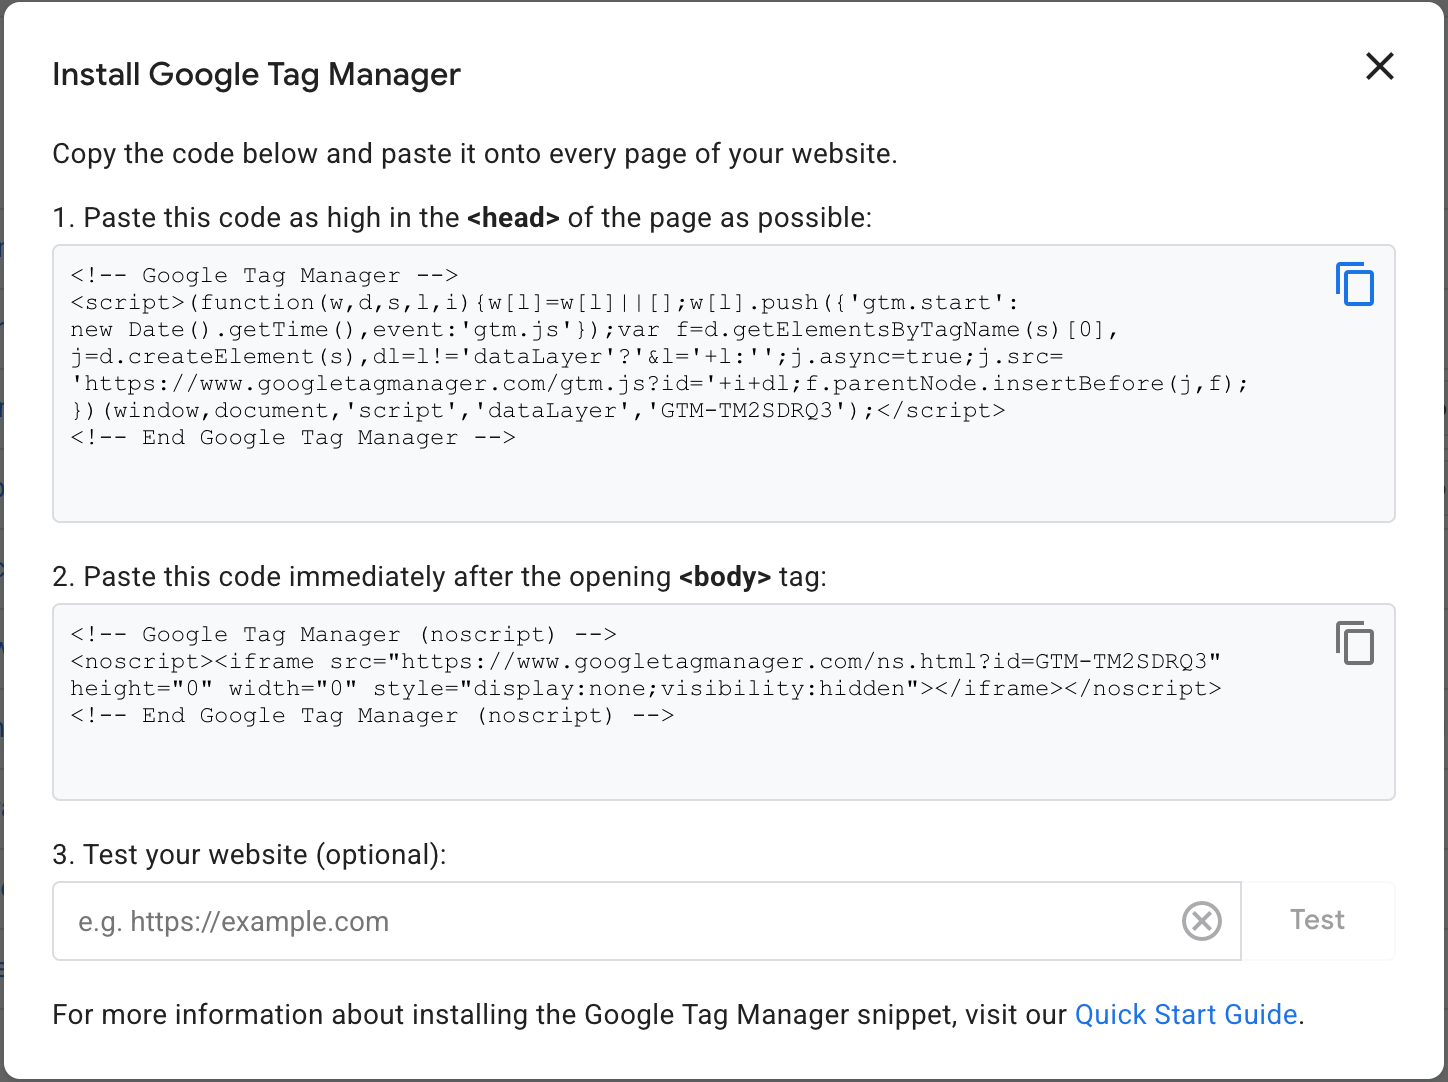
After creating the container, GTM will immediately show you the installation snippet. Keep this tab open.
Step 2: Install the GTM snippet on your website
GTM gives you two code snippets. Both are required. Missing either one may cause tags to misfire or not fire at all.
Snippet 1 goes in the <head> of every page, as high as possible. This is the main loader.
Snippet 2 goes immediately after the opening <body> tag on every page. This is a fallback for browsers with JavaScript disabled.
How you install them depends on your platform:
WordPress. Use a plugin such as GTM4WP. It handles both snippets automatically and places them correctly. Paste your Container ID (format: GTM-XXXXXXX) into the plugin settings.
Shopify. Paste Snippet 1 into the <head> section of your theme.liquid file and Snippet 2 immediately after <body>. Some themes have a dedicated spot for tracking scripts in the theme settings, which is also fine.
Manual install. If you have direct access to your site’s HTML template, paste each snippet into the correct position on every page, or in your site-wide layout template so it appears globally.
After installing, verify the snippets are live using GTM Preview mode (covered in Step 5) or the Google Tag Assistant Chrome extension.
Step 3: Understand the three building blocks
💡 Before creating anything in GTM, you need to understand how tags, triggers, and variables relate to each other. This is the part most tutorials skip, and it is why people end up with a broken mess of duplicate triggers six months in.
Tags are the scripts you want to fire. A Google Ads conversion tag, a GA4 event tag, a Meta Pixel event. These are the things that actually send data somewhere.
Triggers define when a tag fires. On a page view. On a button click. When a custom event is pushed to the data layer. A trigger by itself does nothing. It only matters when a tag is listening to it.
Variables hold dynamic values that your tags and triggers need. Things like the current page URL, a transaction ID from the data layer, or a conversion value. Variables make your setup flexible instead of hardcoded.
The relationship is simple: a tag fires when its trigger conditions are met, and it uses variables to fill in dynamic values. Build in that order: variables first, triggers second, tags last.
Step 4: Naming conventions that actually scale
This is the section that separates a GTM container you can hand off from one that only makes sense to the person who built it. Consistent naming makes your tags readable to anyone, including future you.
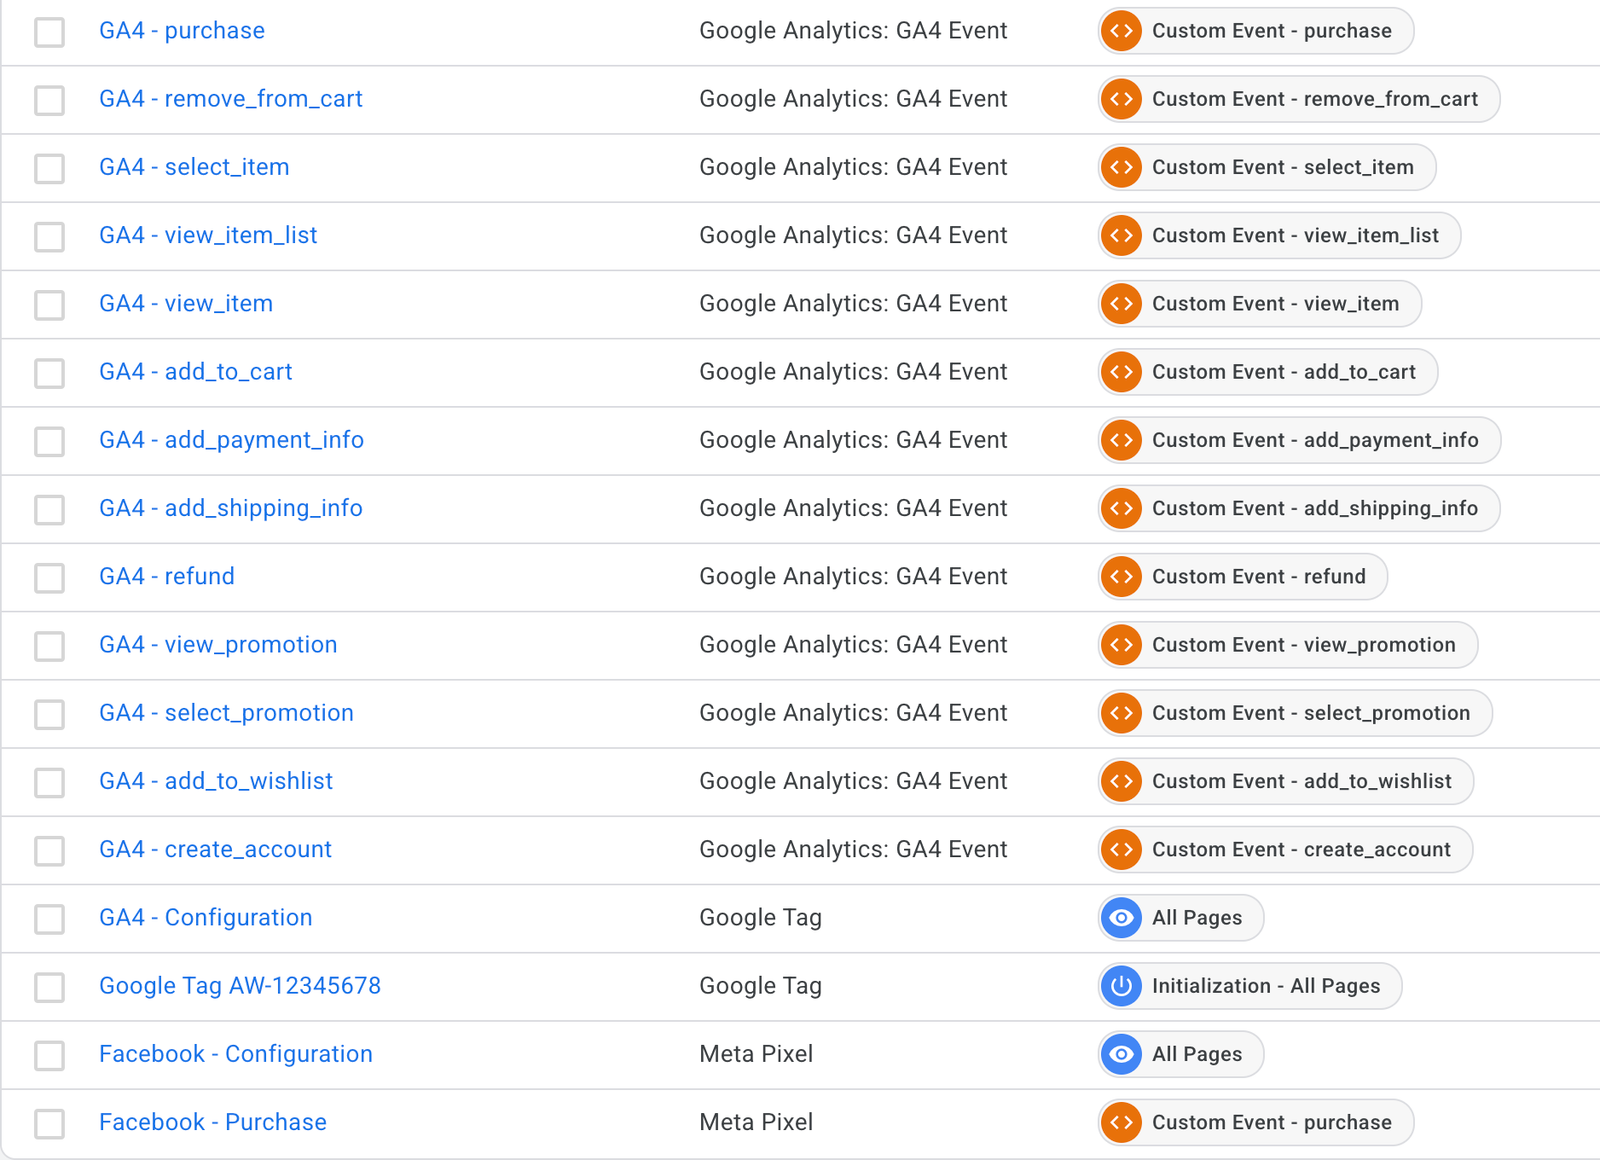
Tags. Use the format [Platform] - [Event or Purpose]. Examples:
GA4 - PurchaseGoogle Ads - PurchaseMeta - PurchaseGA4 - Lead Form SubmitGoogle Ads - Lead Form Submit
This format lets you filter your tag list by platform instantly and know what each tag does without opening it.
Triggers. Use a prefix that describes the trigger type, followed by the event or condition. Common prefixes:
CE -for Custom Event triggers (e.g.,CE - purchase,CE - generate_lead)PV -for Page View triggers (e.g.,PV - All Pages,PV - Thank You Page)CL -for Click triggers (e.g.,CL - CTA Button)SE -for Scroll Depth triggers (e.g.,SE - 50 Percent)
Variables. Use a prefix that describes where the variable gets its value from:
DLV -for Data Layer Variables (e.g.,DLV - transaction_id,DLV - value)JS -for JavaScript Variables (e.g.,JS - Page Title)CJS -for Custom JavaScript Variables (e.g.,CJS - Clean URL)CON -for Constant Variables (e.g.,CON - GA4 Measurement ID)
These conventions apply regardless of what tags you are deploying. Use them from day one, not after your tag list has grown to 40 items.
Step 5: Enable built-in variables you will actually need
GTM ships with a set of built-in variables that are disabled by default. Enable the ones relevant to your setup before you start building triggers and tags. You can always enable more later, but having the basics on from the start avoids confusion.
Go to Variables in the left nav and click Configure under Built-In Variables.
Enable these at minimum:
- Page URL, Page Path, Page Hostname — needed for page-based triggers and debugging
- Click Element, Click Classes, Click ID, Click URL, Click Text — needed if you plan to track button clicks
- Form Element, Form Classes, Form ID, Form URL — needed for form submission tracking
- Scroll Depth Threshold — needed if you plan to track scroll depth events
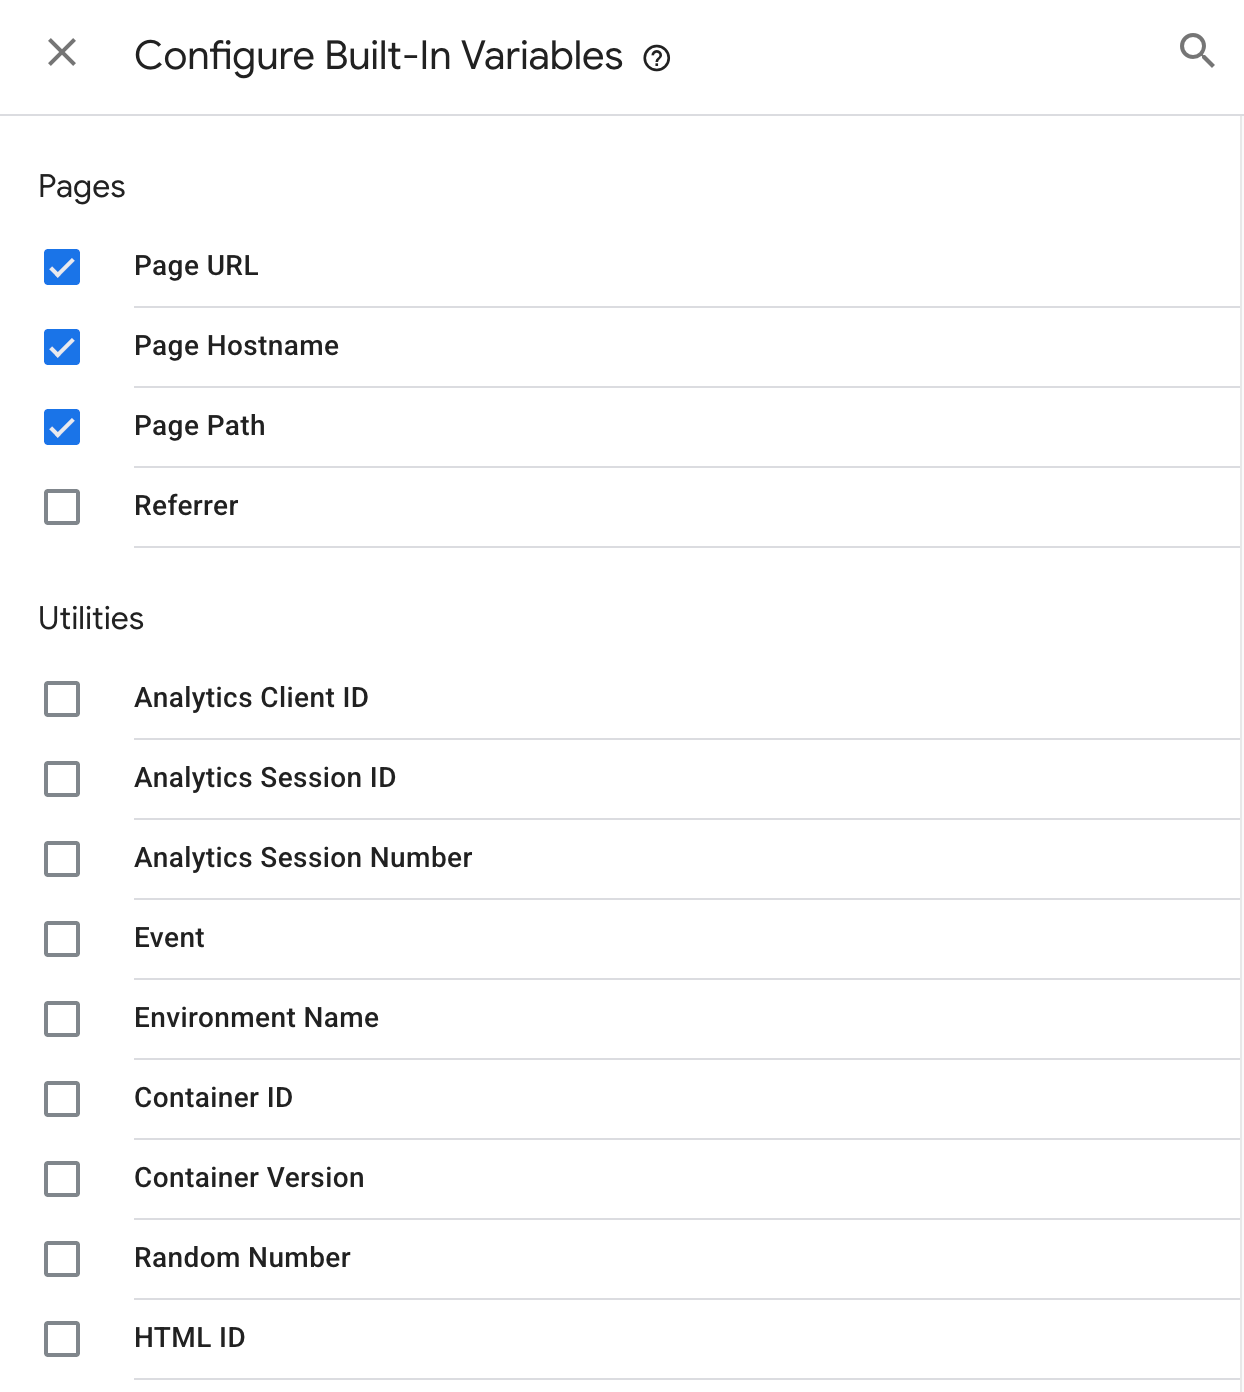
⚠️ You do not need all of them. Enable what is relevant to your site and what you are tracking.
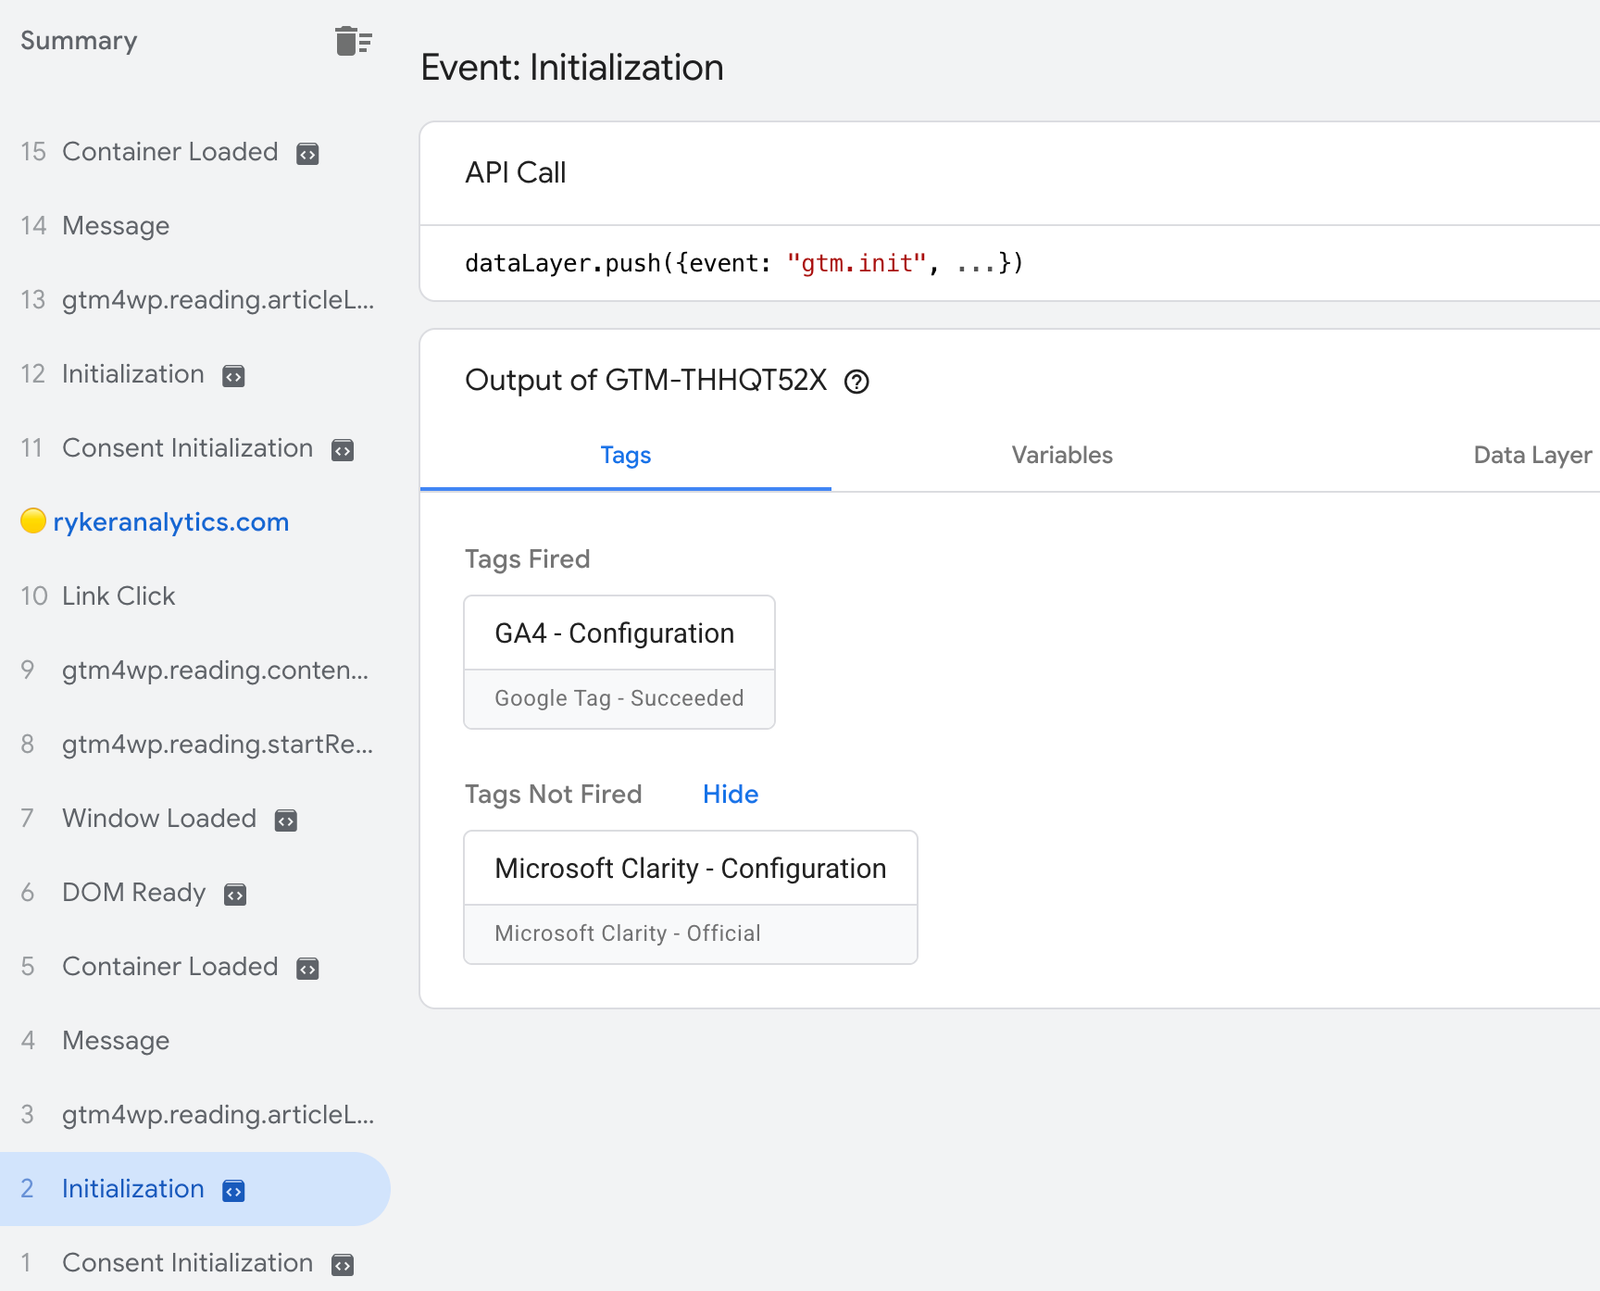
Step 6: Use Preview mode before publishing anything
Preview mode is the most important tool in GTM. Use it every single time before you publish. It shows you exactly which tags fired on which events, what variable values were populated, and what the data layer contained at each point in the page session.
- Click Preview in the top right of GTM.
- Enter your site URL and click Connect. This opens your site in a new tab with the GTM debug panel attached.
- Navigate through your site as a normal user would. Complete the actions you want to track.
- In the debug panel, click each event in the left sidebar to inspect which tags fired, which did not, and why.
- Check the Variables tab for each event to confirm your variable values are populating correctly, not returning
undefined. - Check the Data Layer tab to see the raw data layer state at each event.
Only publish when every tag you intended to fire is listed under Tags Fired, with correct variable values. If a tag appears under Tags Not Fired, open it to see which trigger condition was not met.
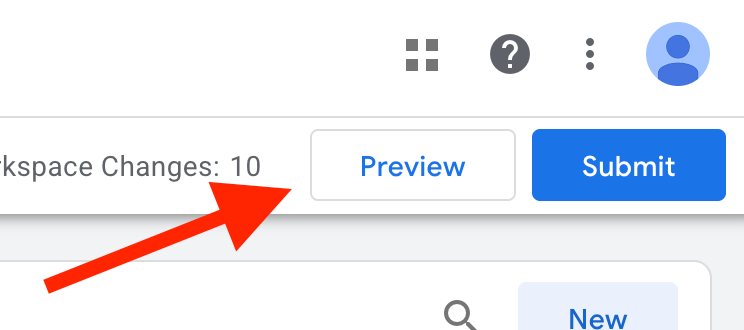
Step 7: Publish with a meaningful version name
When you are ready to go live, click Submit in the top right of GTM. Before clicking Publish, add a version name and description that explains what changed.
Good version names:
- Initial container setup with GA4 base tag
- Add Google Ads purchase conversion tag
- Fix DLV – value variable path for WooCommerce
Bad version names:
- Update
- Test
- Version 4
GTM stores every published version. If something breaks after a publish, you can roll back to any previous version in under a minute. That only works if your version names tell you what each version contained.
Common mistakes
Installing only one of the two snippets. Both snippets are required. Skipping the <body> snippet means GTM will not fire for users with JavaScript disabled. More importantly, some tag types depend on both snippets being present. Install both.
Putting the snippet in the wrong position. The <head> snippet needs to be as high as possible in the head, not buried at the bottom. The lower it sits, the more likely it is that page elements load before GTM can fire, causing missed events.
Using one container for multiple unrelated sites. Each domain should have its own container. Mixing sites in one container makes your tag list a mess and makes debugging much harder.
Publishing without using Preview mode. Preview mode exists for a reason. Publishing an untested change is the fastest way to break tracking you already have working. Always verify first.
Skipping version names. Three months from now you will not remember what “Version 7” contained. Describe every publish, even a small one.
Creating duplicate triggers. If you already have a CE - purchase trigger, do not create a second one for the same event. Multiple tags can share the same trigger. Duplicating triggers bloats your container and creates inconsistencies.
What to do next
A correctly installed GTM container is the foundation. Here is what to build on top of it:
Connect GA4. GA4 is your primary analytics layer and the first tag most setups need. It gives you traffic data, user behavior, and the event infrastructure that everything else depends on. See the guide on how to set up GA4 with Google Tag Manager for the full walkthrough.
Set up Google Ads conversion tracking. Once GTM is live and GA4 is working, Google Ads conversion tracking is the next priority. Without it, you are spending ad budget without knowing which campaigns are producing results. The full setup guide is here: How to Set Up Google Ads Conversion Tracking with GTM.
Add Meta (Facebook) Pixel tracking. If you run Meta ads, the Pixel needs to be deployed through GTM and configured to send purchase and lead events with the correct parameters. Sloppy Meta Pixel setups are one of the most common reasons Meta campaigns underperform. A dedicated post on this is coming soon.
Consider server-side tagging. Client-side tags run in the browser, which means ad blockers and browser restrictions can prevent them from firing. Server-side GTM moves tag execution to a server you control, which improves data accuracy and reduces the impact of tracking prevention. Stape is the most practical way to get a server-side GTM container running without managing your own infrastructure. It is worth looking at once your client-side setup is solid.
Need someone to set this up correctly the first time?
GTM is not complicated, but a messy container is genuinely painful to clean up later. If you would rather have it done right from the start, or you have inherited a container that needs an audit, get in touch.