
What is GTM and why use it with GA4?
Google Tag Manager (GTM) is a tag management system. It’s a middleman that sits between your website and all the tracking tools you use. Instead of hard-coding tracking scripts directly into your site’s HTML, you manage everything through GTM’s interface and push changes without touching your code every time.
GA4 is Google’s current analytics platform (it replaced Universal Analytics in 2023). Together, GTM and GA4 is the industry standard setup for web analytics, and for good reason. It’s flexible, scalable, and once it’s in place, adding or changing tracking is straightforward.
You can paste the GA4 script directly into your site’s <head> tag. But the moment you need to track a button click, a form submission, or a scroll depth, you’ll be calling your developer every single time. GTM lets you do all of that without touching your code again.
✋ What you’ll need before you start
- A Google account
- Access to your website’s code (or a plugin like a header/footer injector if you’re on WordPress)
- A GA4 property already created in Google Analytics. If you haven’t done this yet, go to analytics.google.com, click Admin, and create a new property.
- Your GA4 Measurement ID. It looks like G-XXXXXXXXXX and you’ll find it under Admin > Data Streams > your web stream.
📌 Before you continue: Copy your Measurement ID. You’ll need it in a few steps.
Step 1: Set up your GTM account and container
Head over to tagmanager.google.com and sign in.
- Create an Account
Click “Create Account,” give it your company name. Under “Container Setup,” enter your website URL and select Web as the target platform, then hit Create. - Accept the terms
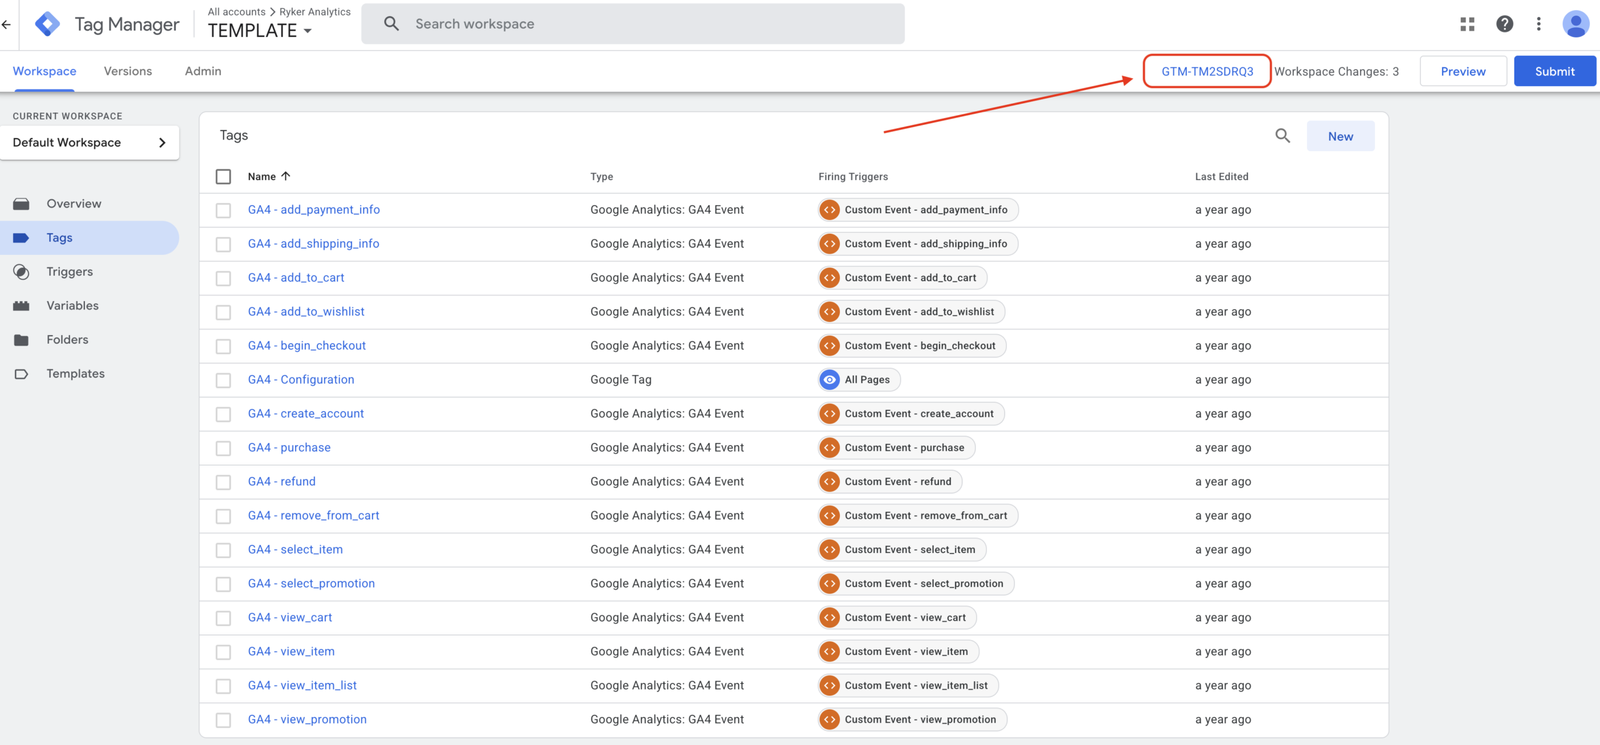
Google will show a terms of service modal. Accept it and you’ll land inside your new GTM container. - Note your Container ID
It’ll look likeGTM-XXXXXXX. You’ll see it in the top right of the GTM interface. This is what identifies your container.
Step 2: Install GTM on your website
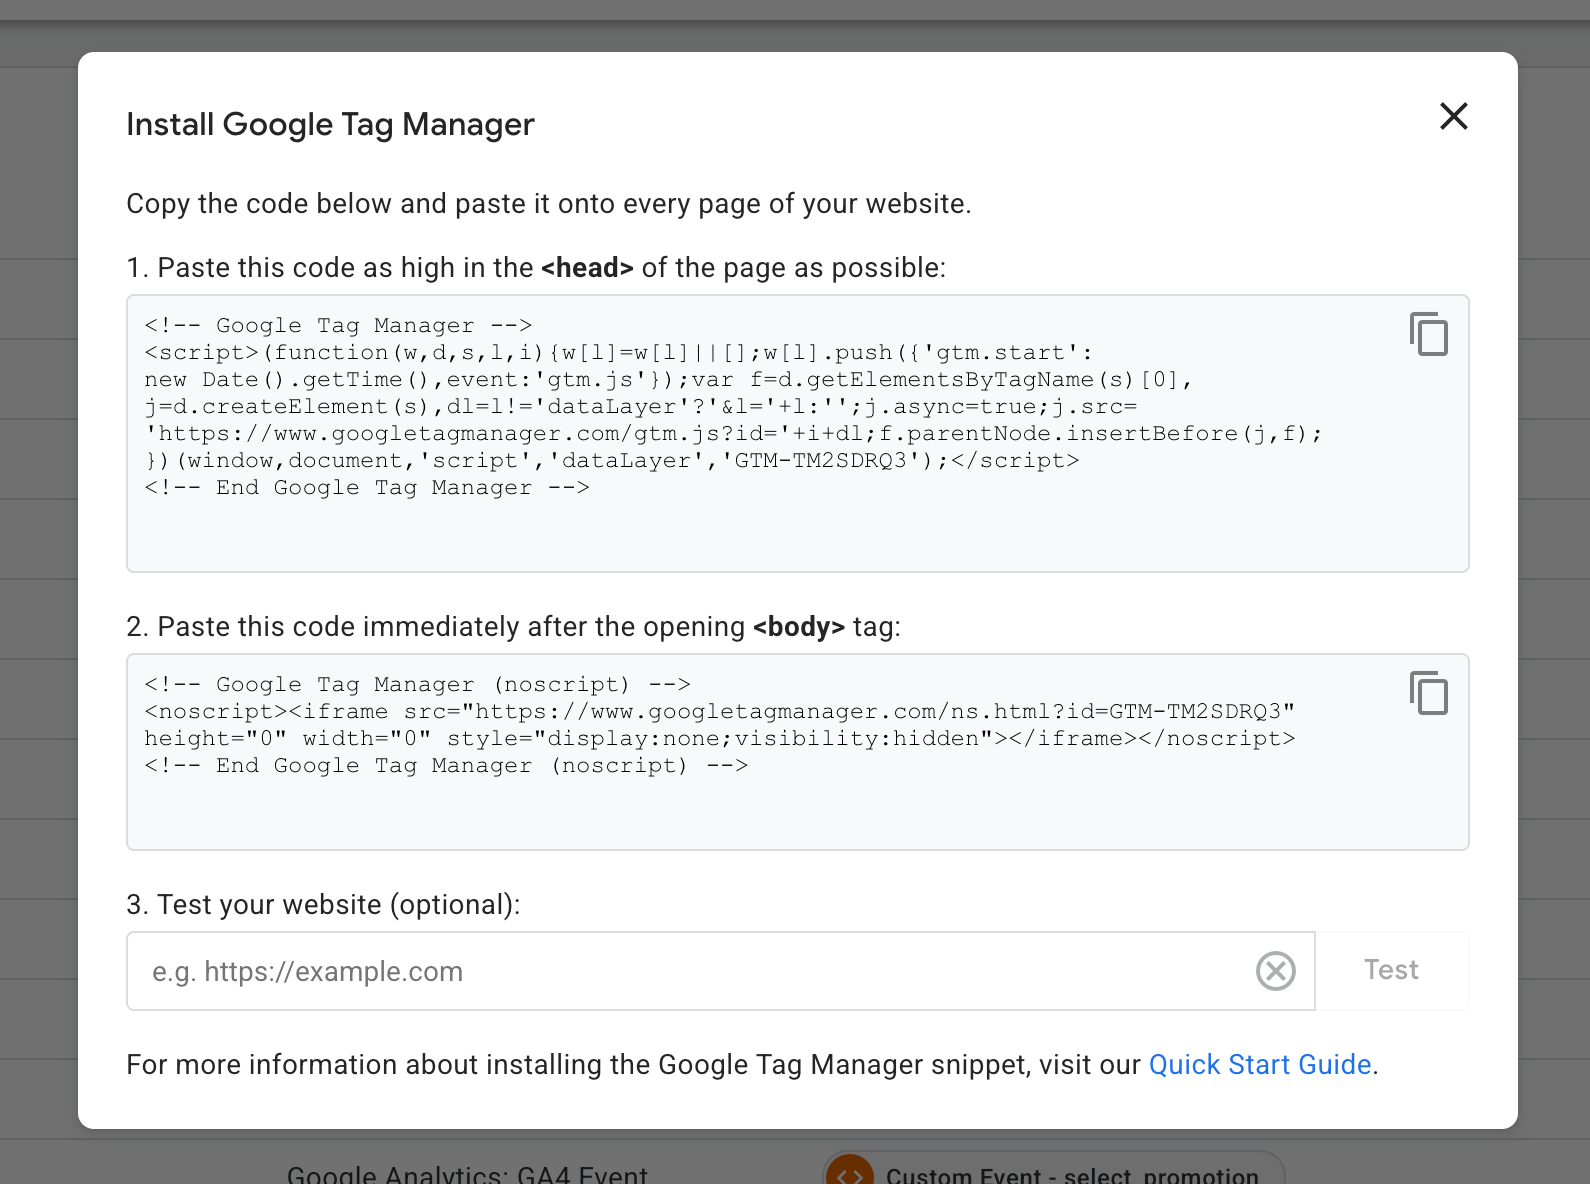
When you create the container, GTM will immediately show you two code snippets. Don’t close this window. However, if you do, you can also view it again by clicking on your GTM ID (shown above)
- The <head> snippet
Copy the first snippet and paste it as high as possible inside the<head>tag of every page on your site. - The <body> snippet
Copy the second snippet and paste it immediately after the opening<body>tag. This is a noscript fallback for browsers with JavaScript disabled.
🟢 On WordPress? Use a plugin like “Insert Headers and Footers” or “WPCode” to add the snippets without editing theme files directly.
🟢 On Shopify? add to theme.liquid.
🟢 On Squarespace? Settings > Advanced > Code Injection.
If someone else manages your site, send them these two snippets with clear instructions on exactly where they go. This is the one and only time you need developer help. Everything after this is handled inside GTM.
Step 3: Create your GA4 Configuration tag in GTM
This is the core tag that loads GA4 on your site. Everything else (events, conversions, etc.) builds on top of this.
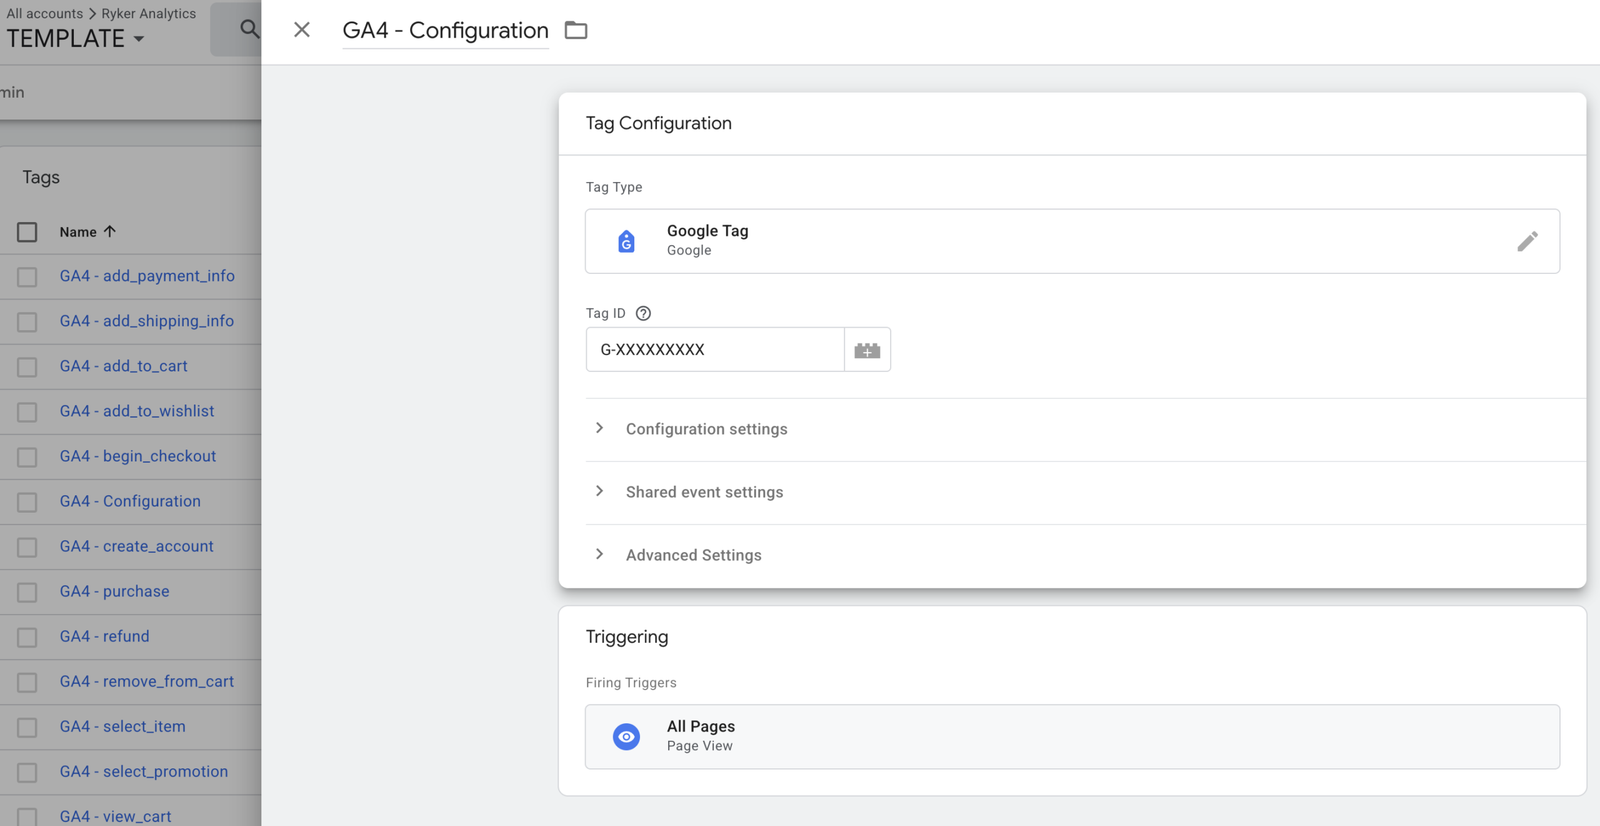
- Go to Tags > New
In GTM, click Tags in the left sidebar, then hit New. - Choose your tag type
Click Tag Configuration, then select Google Tag from the list. (In older GTM accounts you may see this listed as “Google Analytics: GA4 Configuration.” Same thing.) - Enter your Measurement ID
Paste in yourG-XXXXXXXXXXMeasurement ID from earlier. That’s it for the tag config. - Set your trigger
Click Triggering and select All Pages. This tells GTM to fire this tag on every page load, which is exactly what you want for your base GA4 tag. - Name and save your tag
Give it a clear name like GA4 – Configuration so it’s easy to find later, then hit Save.
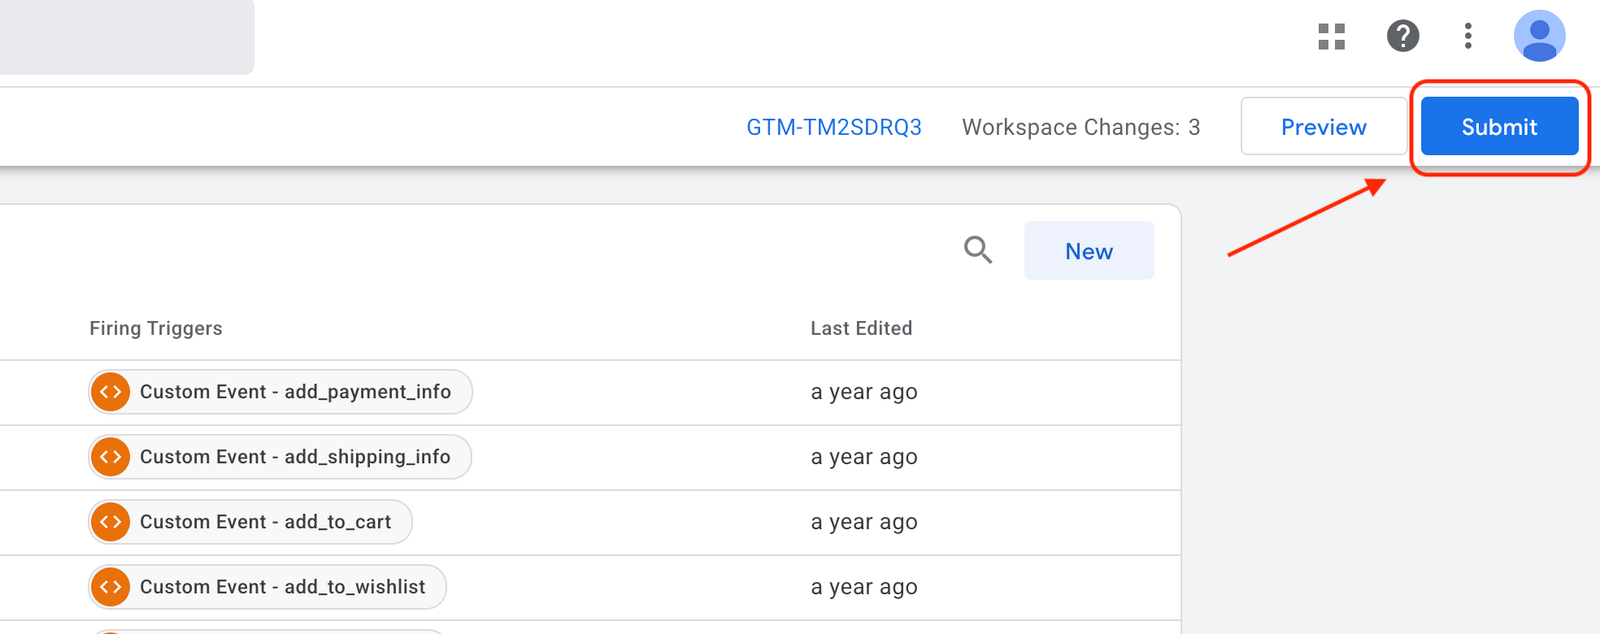
Step 4: Publish your container
GTM changes don’t go live until you publish them. Until you hit Submit, your tag exists in draft mode and nothing is firing on your live site. This trips up a lot of people.
- Click Submit
In the top right corner of GTM, click the blue Submit button. - Add a version name
GTM will ask for a version name and description. Be descriptive here. Something like “Added GA4 Configuration tag” is way more useful than “Version 1” six months from now. - Click Publish
Hit Publish and your changes go live. GA4 is now tracking on your site.
Step 5: Verify it’s working
Never assume tracking is working. Always verify. Here’s how to confirm GA4 is receiving data:
Option A: GTM Preview mode
Before or after publishing, click Preview in GTM and enter your website URL. GTM opens your site with a debug panel at the bottom. You should see your GA4 – Configuration tag fire on the page load event. If it shows up under “Tags Fired” you’re good.
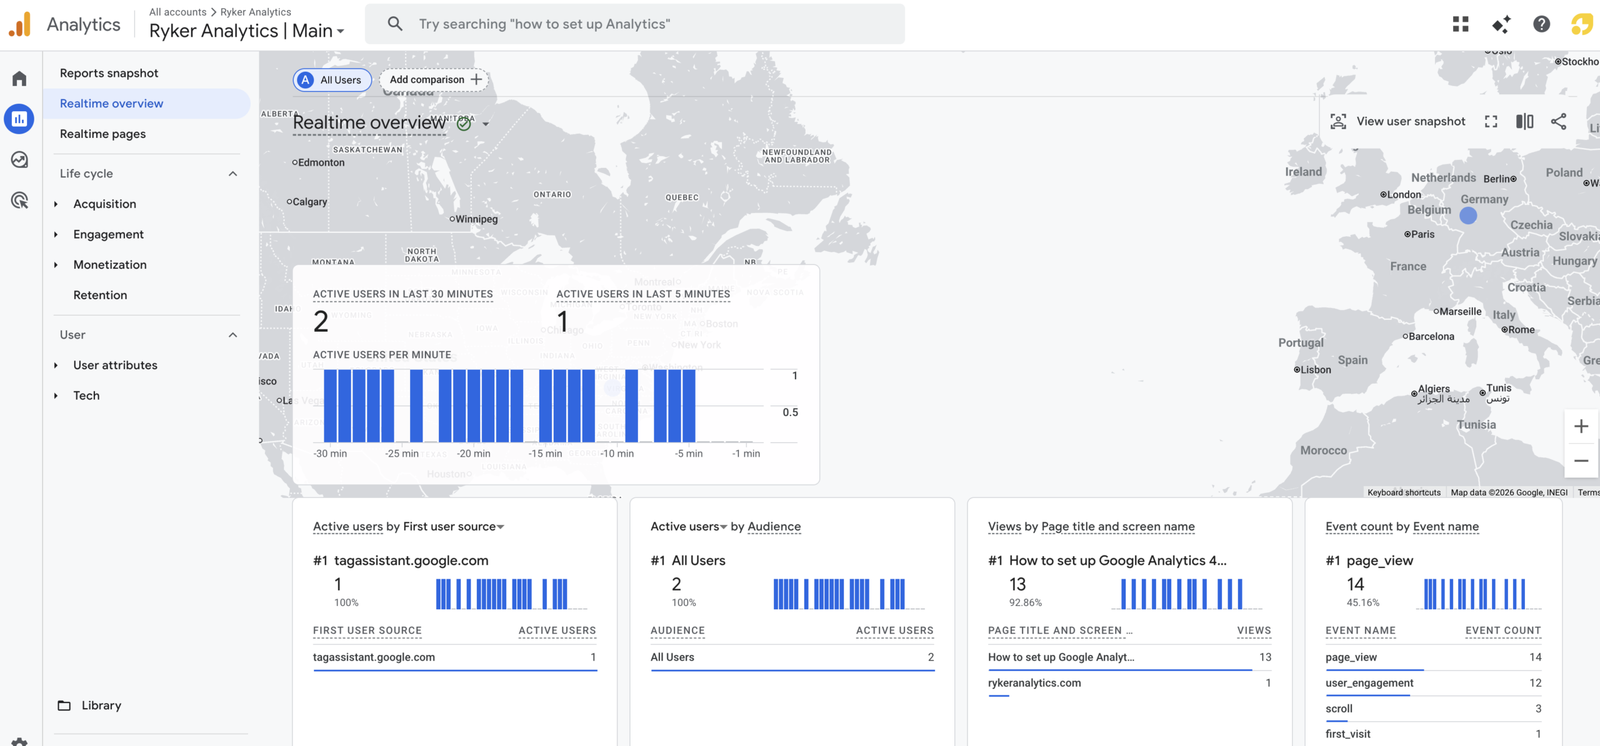
Option B: GA4 Realtime report
Open Google Analytics, go to Reports > Realtime, and visit your website in a separate tab. Within 30 seconds you should see yourself show up as an active user. If you do, GA4 is receiving data.
Option C: Google Tag Assistant
Install the Google Tag Assistant Chrome extension. It will tell you exactly which tags are firing on any page and flag any errors it finds.
⚠️ Not seeing data in Realtime? Check that your GTM snippets are installed on the live version of the site (not a staging environment), and that your GA4 Measurement ID is correct. A typo there is the most common culprit.
Common mistakes to avoid
❌ Firing GA4 twice
If you already had the GA4 snippet pasted directly into your site’s code and also added it through GTM, you’re now double-tracking every visitor. Check your site’s HTML for any existing GA4 or gtag scripts and remove them before publishing the GTM version.
❌ Not publishing after making changes
GTM changes don’t go live until you hit Submit. It sounds obvious but it’s easy to forget, especially when you’re making a lot of changes in one session.
❌ Using the wrong Measurement ID
Your GA4 Measurement ID starts with G-. Don’t confuse it with your GTM Container ID (which starts with GTM-) or an old Universal Analytics property ID (which starts with UA-).
❌ Skipping the verify step
Always check that it’s working. Broken tracking that goes unnoticed for weeks means missing data you can never get back.
You’re set. Now build on top of it.
Getting your GA4 Configuration tag set up is step one. From here you can start layering in event tracking: button clicks, form submissions, scroll depth, purchases. You can also start connecting your conversion data to paid channels like Google Ads, Meta, and TikTok.
Each of those deserves its own post, so stay tuned. If you’d rather have someone set it up correctly for you from the start, that’s exactly what we do at Ryker Analytics.