
If you are running Facebook Ads and not tracking conversions properly, you are optimizing blind. The Facebook Pixel tells Meta which users converted, which powers the algorithm to find more of them. Without it, your campaigns cannot learn, your cost per result climbs, and your reporting is guesswork.
This guide walks through the right way to implement Facebook conversion tracking through Google Tag Manager using the Facebook Pixel base code template from the GTM template gallery. No manual script pasting, no tag bloat, and every piece named consistently so your container stays clean as it scales. Need help with correct attribution?
Why this matters
Meta’s ad algorithm relies on conversion signals to optimise delivery. Without a properly firing Pixel, you lose purchase data, audience building breaks down, and you cannot retarget visitors who did not convert. Getting this right is foundational to any Facebook Ads strategy.
Prerequisites
Before you start, make sure you have:
- A Facebook Business Manager account with an active Ad Account
- A Facebook Pixel created inside Events Manager
- Your Pixel ID (a 15-16 digit number found in Events Manager)
- Google Tag Manager published and running on your website
- A thank-you or order confirmation page that fires after a purchase
- Access to the dataLayer or the ability to push values to it (for dynamic order values)
Step 1: Add the Facebook Pixel Template to GTM
Instead of pasting raw JavaScript, use the official Facebook Pixel tag template from the GTM Community Template Gallery. This approach is cleaner, easier to maintain, and reduces the risk of implementation errors.
- Open the Template Gallery. In GTM, go to Templates in the left navigation. Under Tag Templates, click Search Gallery.
- Find the Facebook Pixel template. Search for Facebook Pixel. Select the template published by Facebook (the verified publisher). Click Add to workspace and confirm.
Step 2: Create the Pixel ID Variable
Store your Pixel ID as a constant variable. This means if your Pixel ID ever changes, you update it in one place rather than hunting through every tag.
- Go to Variables. Scroll to User-Defined Variables and click New.
- Configure the variable. Set the variable type to Constant and enter your Pixel ID as the value. Name it CONST – Facebook Pixel ID.
Variable name:  CONST - Facebook Pixel ID
Variable type:  Constant
Value:          [Your 15-16 digit Pixel ID]
The CONST - prefix makes it immediately clear in the variable list that this is a hardcoded value, not a dynamic one pulled from the dataLayer or DOM.
Step 3: Create dataLayer Variables for Purchase Data
To pass dynamic values like order value and currency to Facebook, you need to read those values from the dataLayer. If your site already has an e-commerce dataLayer (GA4 purchase event, for example), you can tap into those same values.
- Go to Variables and click New under User-Defined Variables.
- Create the transaction ID variable. Set the type to Data Layer Variable, set the Data Layer Variable Name to
ecommerce.transaction_id, and name it DLV – transaction_id. - Create the value variable. Repeat the same process with Data Layer Variable Name
ecommerce.valueand name it DLV – purchase_value. - Create the currency variable. Repeat with Data Layer Variable Name
ecommerce.currencyand name it DLV – currency.
The DLV - prefix means Data Layer Variable, making it easy to distinguish from constants, JavaScript variables, or auto-event variables in your variable list.
If your site does not already push these to the dataLayer, your developer will need to add a dataLayer push on the order confirmation page. A standard push looks like this:
window.dataLayer = window.dataLayer || [];
dataLayer.push({
  event: 'purchase',
  ecommerce: {
    transaction_id: 'ORDER-12345',
    value: 99.00,
    currency: 'USD'
  }
});
Check your data layer in GTM Preview before assuming the key names match. Some platforms use transactionId or revenue instead of the GA4-style ecommerce object. Adjust your variable names to match what your site actually pushes.
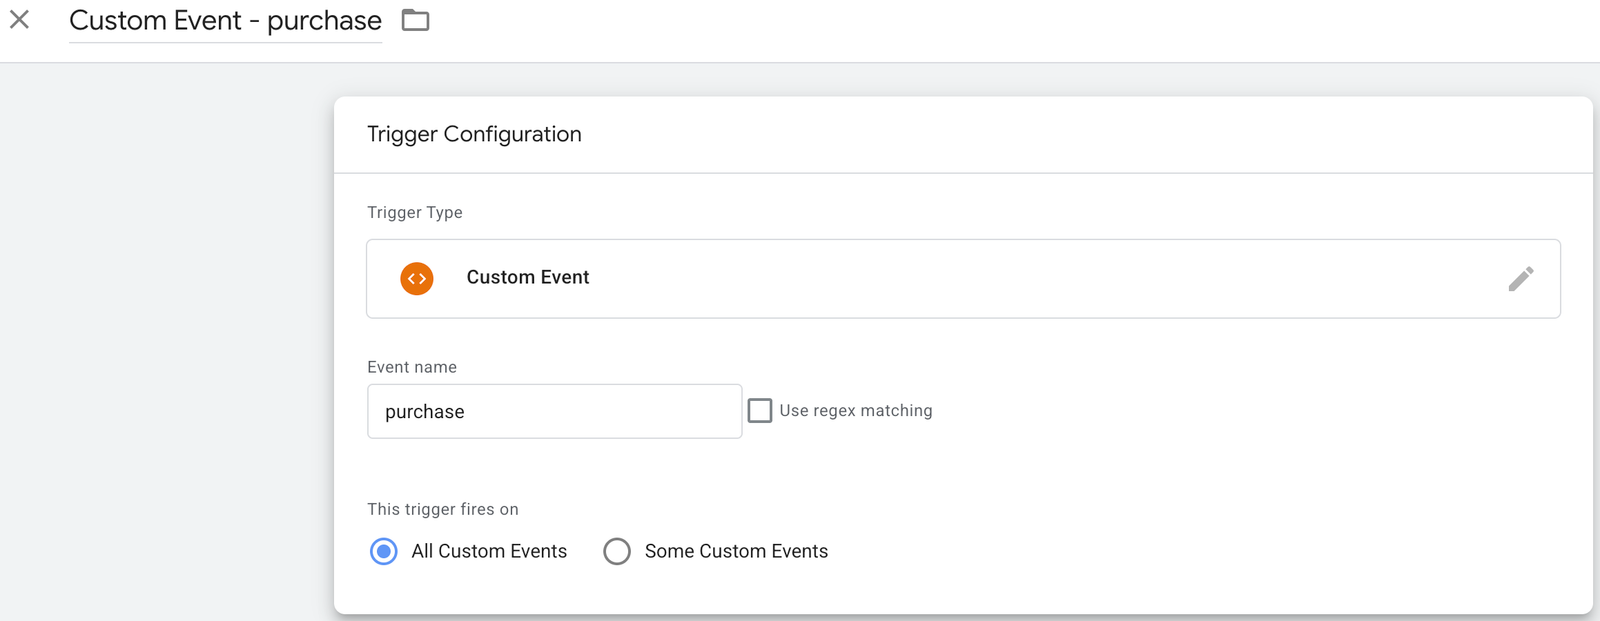
Step 4: Create the Purchase Trigger
The trigger fires the Facebook Purchase tag when the dataLayer purchase event is detected. This is a Custom Event trigger, not a Page View trigger, because you want precision. You only want this tag firing when an actual transaction has been confirmed, not on every page load.
- Go to Triggers and click New.
- Select Custom Event as the trigger type.
- Set the Event Name to
purchase. Leave it set to fire on All Custom Events unless you need to restrict it further. - Name the trigger: Custom Event – purchase. The
CE -prefix stands for Custom Event and keeps all custom event triggers grouped together when you sort your trigger list alphabetically.
Step 5: Create the Facebook Base Code Tag (PageView)
Before tracking conversions, the Pixel base code needs to fire on every page. This initialises the Pixel, enables page view reporting in Facebook Events Manager, and enables website custom audiences.
- Go to Tags and click New.
- Select the Facebook Pixel template you added in Step 1.
- Set the Pixel ID to
{{CONST - Facebook Pixel ID}}and set the Event Name to PageView. The template handles thefbq('init')andfbq('track', 'PageView')calls automatically. - Set the trigger to All Pages (Page View).
- Name the tag: Facebook – PageView. Save.
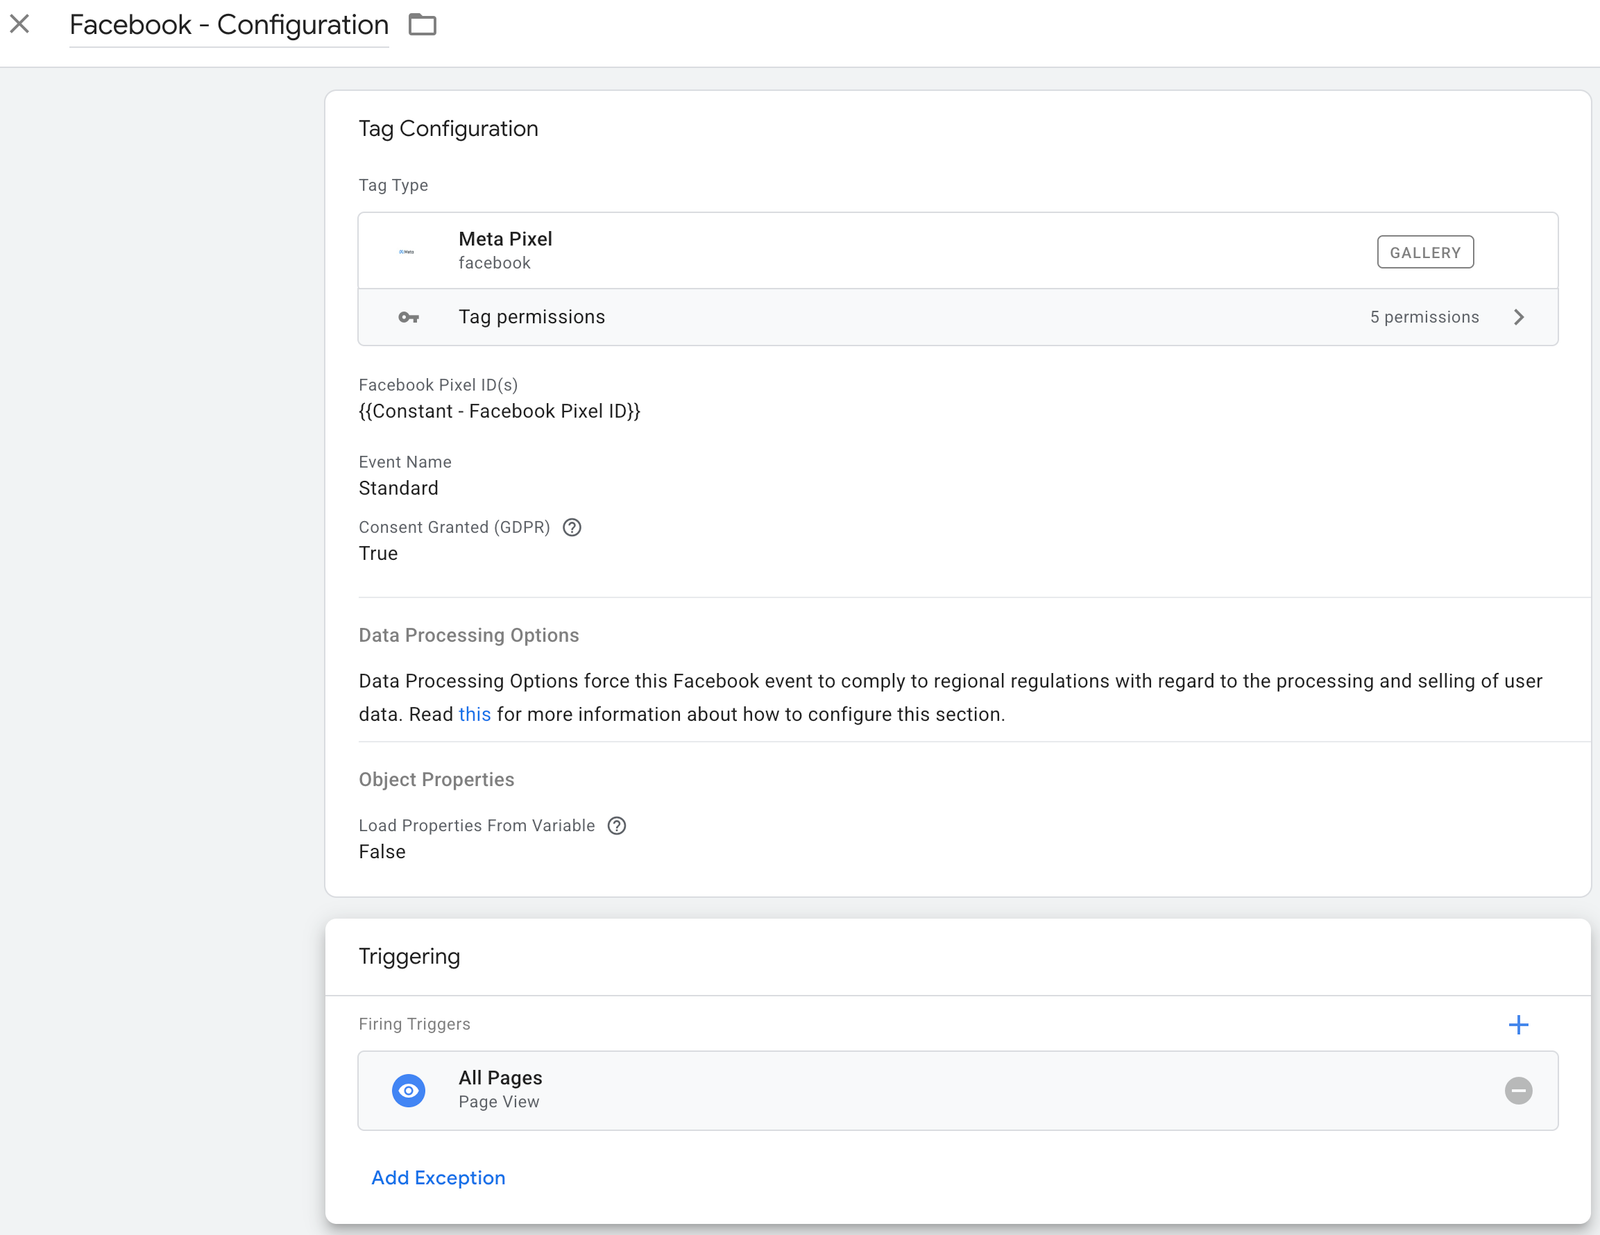
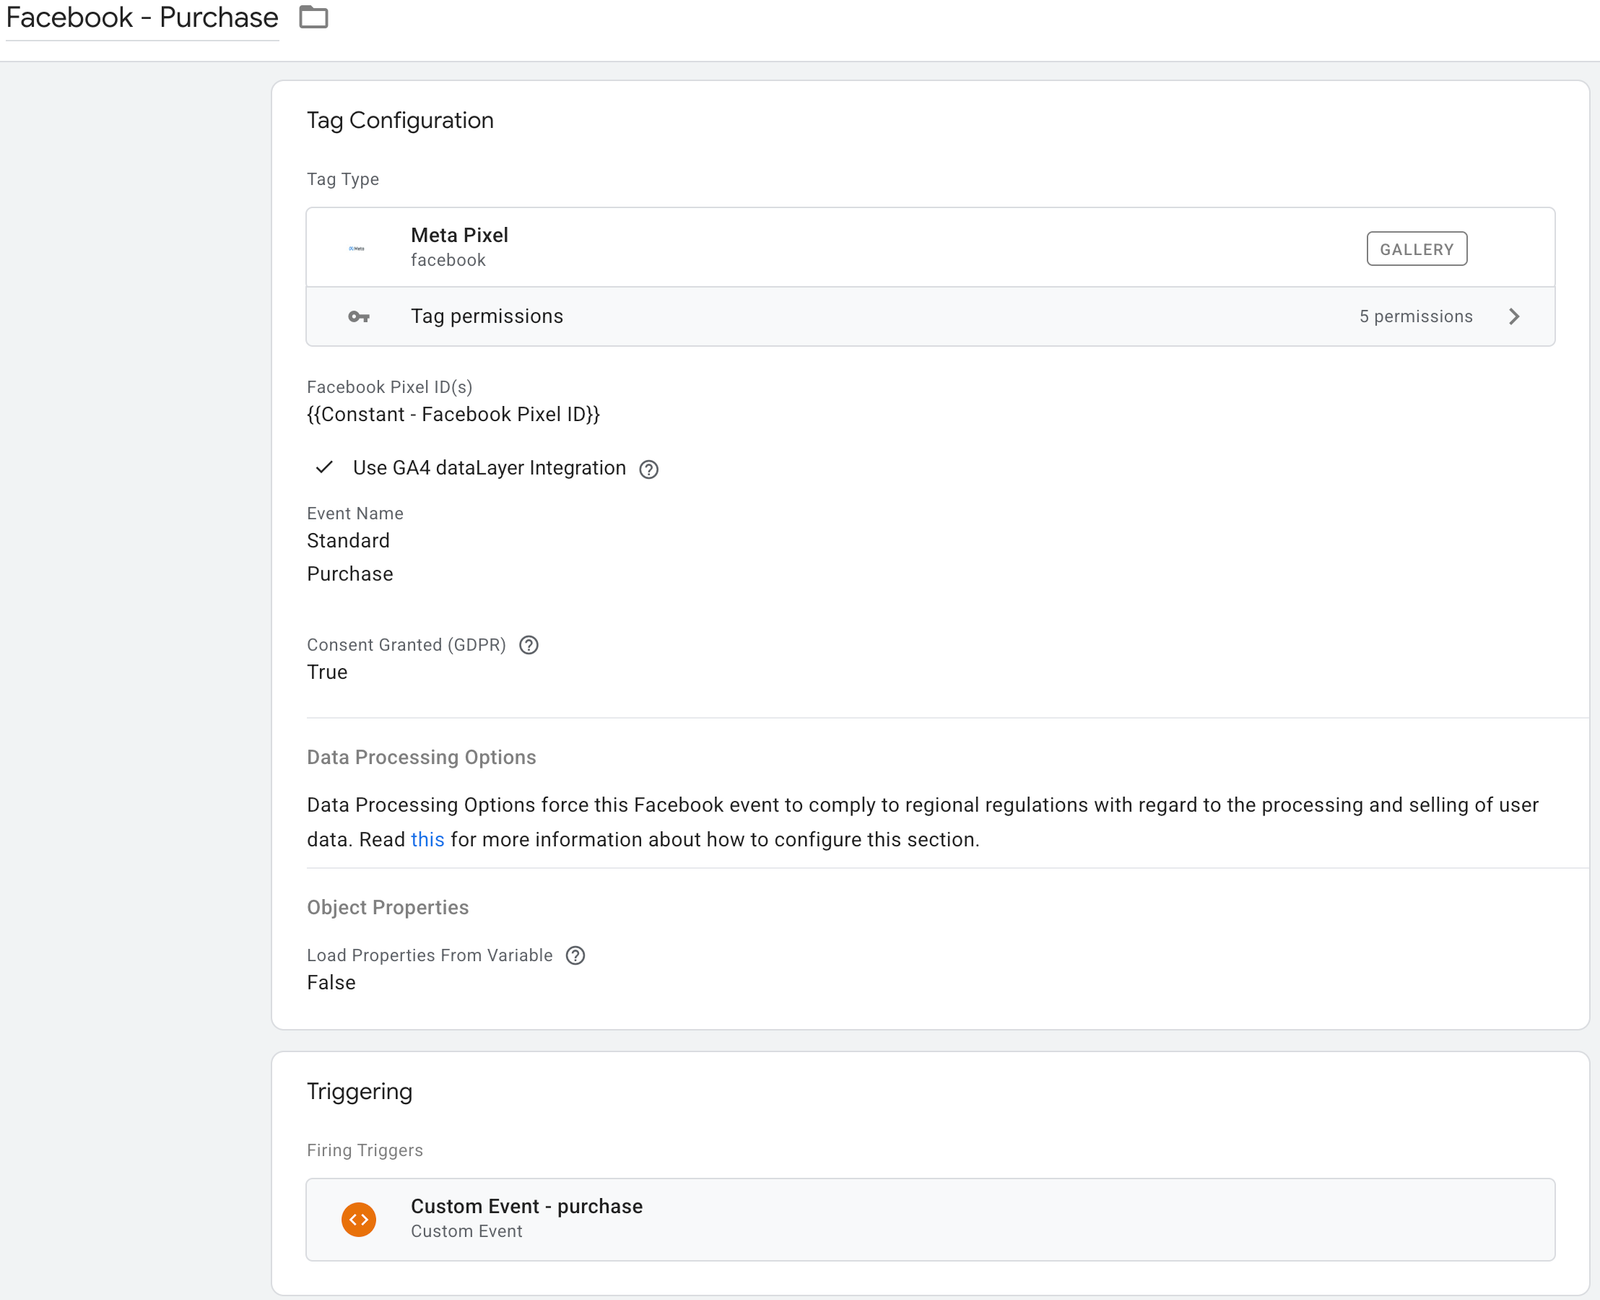
Step 6: Create the Facebook Purchase Tag
This is the conversion tag. It fires when a purchase is confirmed and passes the transaction value, currency, and order ID to Facebook.
- Go to Tags and click New.
- Select the Facebook Pixel template.
- Set the Pixel ID to
{{CONST - Facebook Pixel ID}}and select Purchase from the Event Name dropdown. This surfaces the standard Purchase event parameter fields. - Map the event parameters to your dataLayer variables: set value to
{{DLV - purchase_value}}, currency to{{DLV - currency}}, and order_id to{{DLV - transaction_id}}. - Set the trigger to CE – purchase.
- Name the tag: Facebook – Purchase. Save.
Step 7: Test Before Publishing
⚠️ Never publish Facebook tags without testing. A double-firing Purchase tag means duplicate conversions reported to Meta, which corrupts your data and your campaign optimisation.
- Click Preview in GTM and open your site. Navigate to your order confirmation page (or trigger a test transaction). In the Tag Assistant panel, confirm that Facebook – PageView fires on all pages and Facebook – Purchase fires exactly once on the confirmation page.
- Check variable values. Click the
purchaseevent in the left panel of Tag Assistant. Under Tags Fired, confirm Facebook – Purchase appears. Under Variables, confirm the dataLayer variable values are populated with your expected order value and currency. If any show asundefined, your Data Layer Variable Name does not match what the site is pushing. Check the Data Layer tab in Preview to see the exact key structure. - Verify in Facebook Events Manager. Go to Events Manager in Meta Business Suite. Select your Pixel and open the Test Events tab. Enter your site URL, trigger a test purchase, and confirm the Purchase event appears with the correct parameters in real time.
⚠️ Do not publish until variable values are populated with real data, not undefined.
Step 8: Publish Your GTM Container
- Click Submit in GTM. Give your version a clear name and description so future you (or a colleague) knows what was added.
- Add a version name such as Facebook Pixel – Base + Purchase tracking and a brief description noting what was added and which trigger it fires on.
- Click Publish. Your tags are now live. Give it 24 hours for Facebook Events Manager to begin showing consistent conversion data.
Common Mistakes
Firing the Purchase tag on a Page View trigger instead of a Custom Event trigger. If you use a URL-based page view trigger on your confirmation page, the tag fires every time someone loads that URL, including return visits. This inflates your conversion count. Use the CE - purchase Custom Event trigger tied to the dataLayer push so the tag only fires when a genuine transaction is recorded by your site.
Hardcoding the order value instead of using a variable. A hardcoded value like 99.00 means every reported purchase is the same amount regardless of what the customer actually spent. This breaks ROAS reporting and budget optimisation. Always pull the value dynamically from the dataLayer.
Not passing a currency code. Without a currency parameter, Facebook defaults to the account currency. If your site transacts in multiple currencies, this causes mismatched reporting. Always pass the currency code explicitly.
Skipping the base PageView tag. Some implementations only add the Purchase event tag and skip the base PageView tag. Without the PageView tag, your Pixel does not initialise on most pages. This means website custom audiences are incomplete and your retargeting pools are smaller than they should be.
Not deduplicating conversions when also using the Conversions API. If you are running both the browser Pixel via GTM and the Meta Conversions API server-side, you need to pass a matching event_id on both. Without deduplication, Meta counts both signals as separate conversions and your numbers double. Pass a consistent event_id (typically your transaction ID) on the GTM tag and your server-side implementation.
Need help getting this set up correctly?
At Ryker Analytics, we implement and audit Facebook Pixel setups for businesses that need their conversion data to be accurate before they scale spend. If your Purchase event is not firing, your values are showing as undefined, or you want a full audit of what is and is not tracking, get in touch.