
How to Set Up VWO for A/B Testing, Heatmaps, and Session Recordings (Complete Guide)
If you’re running experiments on your website without a dedicated testing and behavior analytics platform, you’re leaving conversion wins on the table. VWO (Visual Website Optimizer) is one of the most complete CRO platforms available — combining A/B testing, heatmaps, session recordings, form analytics, and conversion tracking all under one roof.
In this guide, I’ll walk you through how to get VWO fully set up: installing the SmartCode, creating your first A/B test, enabling heatmaps and session recordings, and using the VWO Event Streamer GTM custom tag template to send conversion events into VWO from Google Tag Manager.
Ready to start testing? Get started with VWO free for 30 days →
Prerequisites
- A VWO account (free trial available)
- Google Tag Manager already installed on your website
- Access to your GTM container (Editor permissions)
- A clear hypothesis for what you want to test (recommended, not required)
- For the VWO Event Streamer: a Data360-enabled VWO account (available on Growth plan and above)
Step 1: Install the VWO SmartCode on Your Website
Everything in VWO — A/B tests, heatmaps, session recordings — depends on the VWO SmartCode being present on your pages. This lightweight JavaScript snippet connects your site to VWO’s servers and handles variation delivery, visitor tracking, and traffic allocation.
<head> of your HTML template instead.
1. Get your SmartCode
Log into your VWO account and navigate to Settings → SmartCode. If you have not yet set up your account, you will be guided through the setup flow. Also, depending on the platform that your website is built on, you may be able to connect directly via an app/plugin, without having to install any code. Otherwise, you can copy the VWO SmartCode. It will look something like this:
<!-- Start VWO Async SmartCode -->
<script type='text/javascript'>
window._vwo_code = window._vwo_code || (function(){
  var account_id = YOUR_ACCOUNT_ID,  // Replace with your VWO Account ID
  // ... rest of SmartCode from VWO dashboard
})();
</script>
<!-- End VWO SmartCode -->
2. Paste it in your <head>
The SmartCode should be placed as high as possible in the <head> tag of every page you want to track.
3. Verify SmartCode installation
Back in VWO, go to Settings → SmartCode and use the SmartCode Checker. Enter your page URL and VWO will confirm whether the code is detected correctly.
Step 2: Create Your First A/B Test in VWO
With SmartCode installed, you’re ready to build a test. VWO supports multiple test types — A/B, Split URL, Multivariate, and more — but we’ll start with a standard A/B test.
1. Start a new campaign
From your VWO dashboard, go to Testing → A/B → Create. You’ll be taken to the campaign configuration screen.
2. Set your test URL
Enter the URL of the page you want to test. Use the Advanced tab to apply URL matching rules — wildcards, regex, or exact match — if your test spans multiple pages.
3. Build your variation
Click into Variation 1 and VWO will open its visual editor directly on your page. From here you can:
- Edit headline and body copy
- Change button text, color, and size
- Show or hide elements
- Reorder page sections
- Inject custom HTML or CSS
If you’re comfortable with code, switch to the Code Editor for finer control over the changes. Not sure where to begin? Tell us what kind of test you want set up here, and we will help you out!
4. Configure traffic allocation
By default, VWO splits traffic 50/50. You can adjust this — for example, 80% control / 20% variation — if you want to minimize exposure to an unproven change.
5. Set your success metric (Goal or Metric)
Choose what counts as a conversion: a page visit, a click on an element, or a custom event. If your account has Data360 enabled, you’ll see “Metrics” instead of “Goals” — same concept, more flexibility. We’ll cover custom conversion events via GTM in Step 5 below.
6. Define your audience
Target by device type, browser, geography, traffic source, UTM parameters, or GTM Data Layer variables. For most tests, “All visitors” is a fine starting point.
7. Launch the test
Review your settings and click Start Campaign. VWO will begin serving variations immediately to incoming traffic.
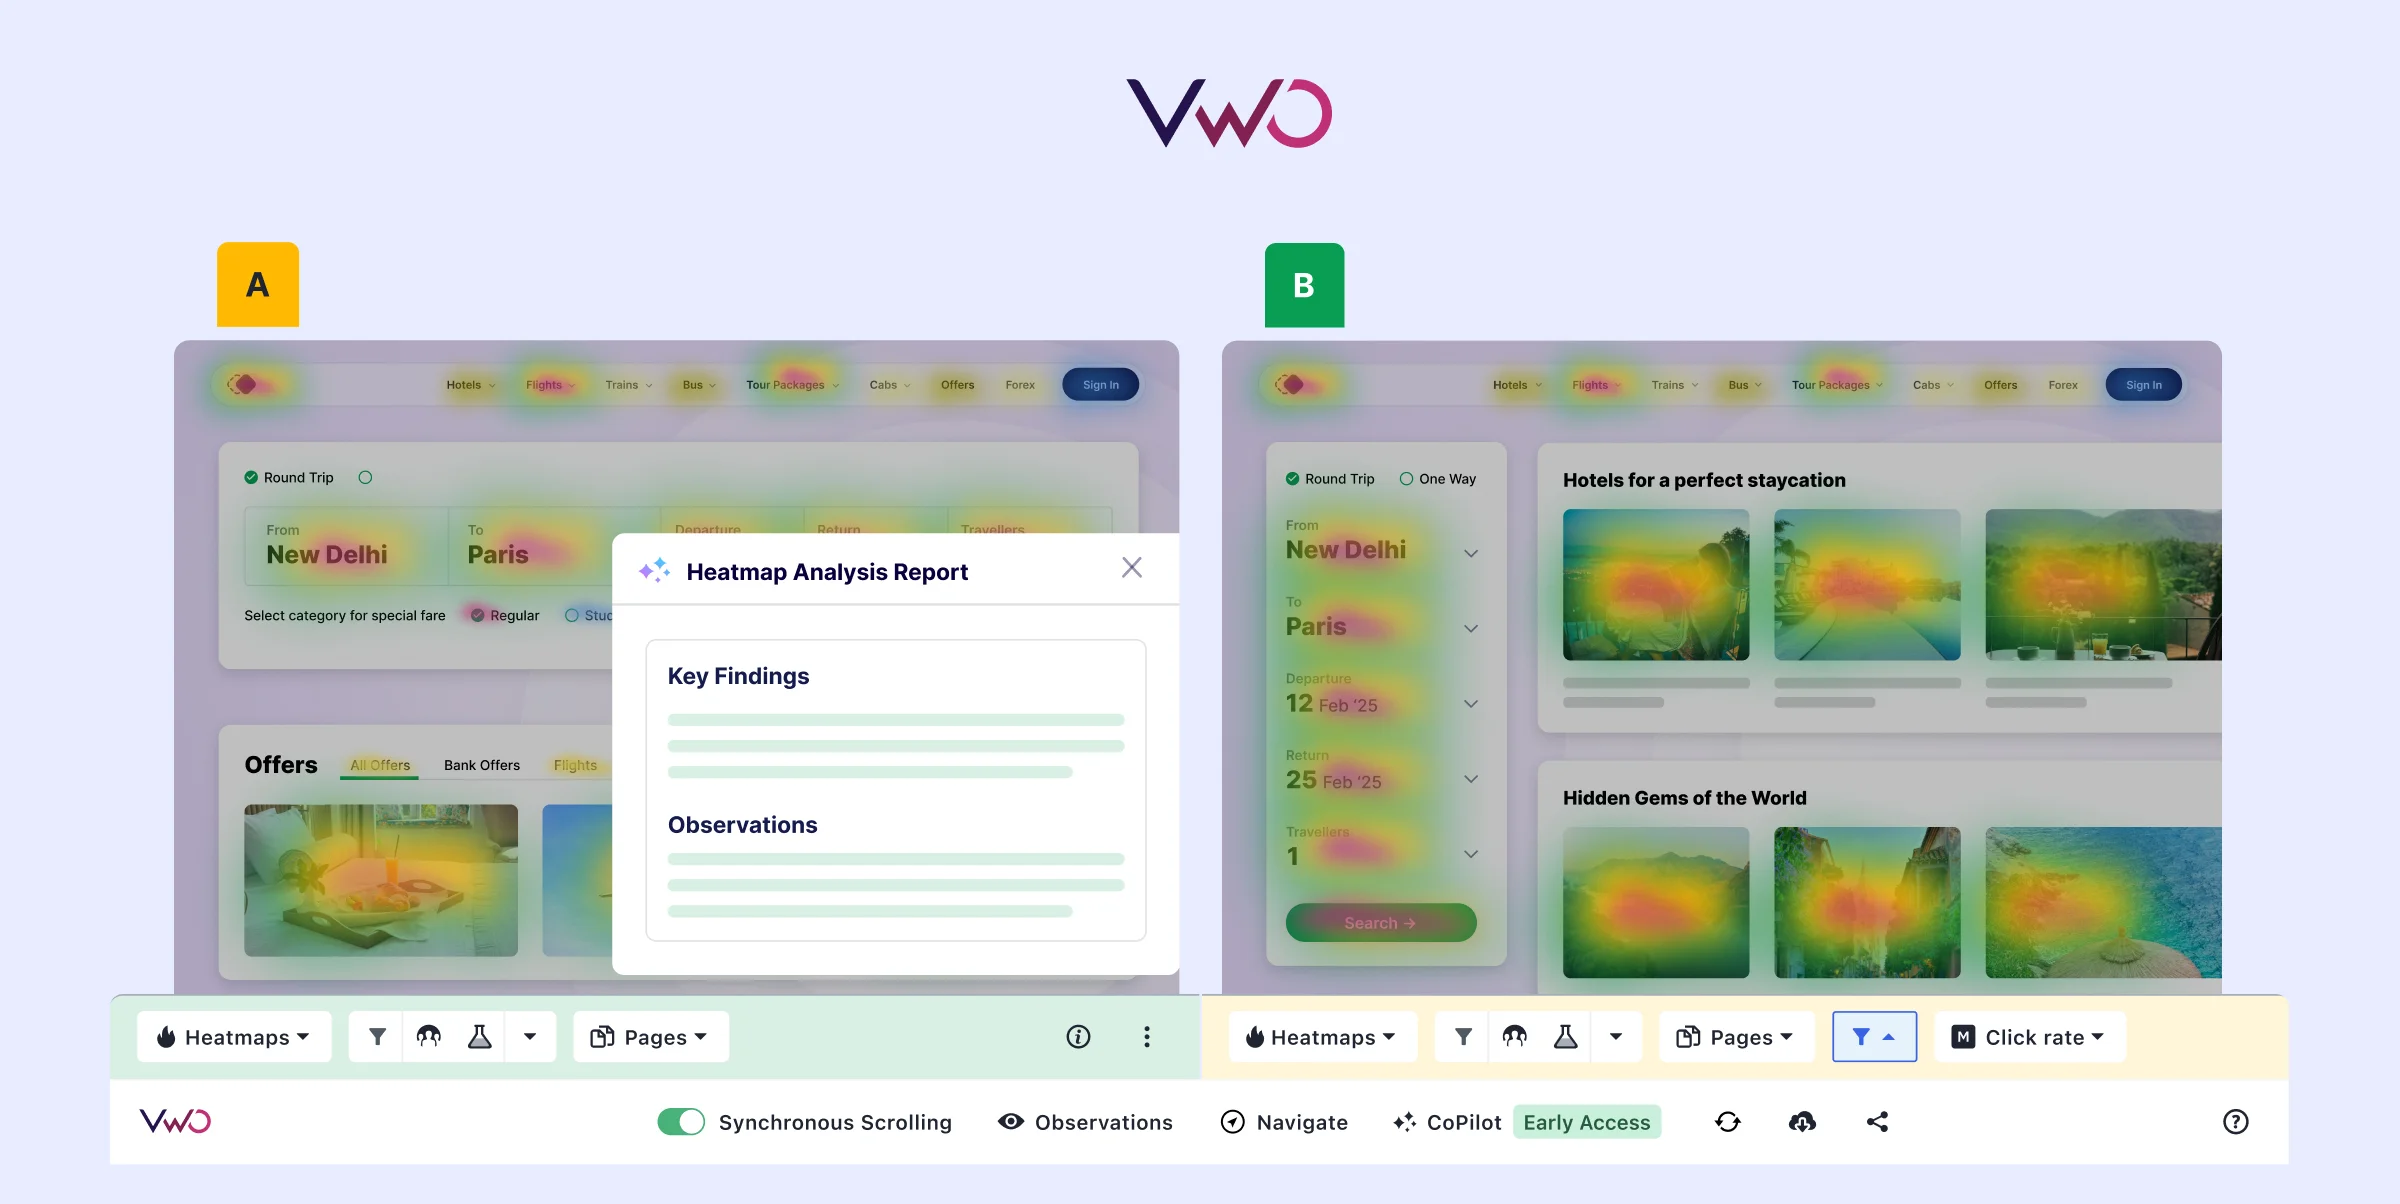
Step 3: Set Up Heatmaps in VWO
Heatmaps answer the “what” behind your test results. Before you launch tests — or to generate test hypotheses — heatmaps show you exactly where users click, how far they scroll, and where they hover. In VWO, heatmaps can even help find analytics insights from your pages that you may have missed.
1. Enable Heatmaps
Navigate to Insights → Heatmaps. If this is your first time, click Enable Now. Once enabled, VWO automatically begins collecting heatmap data on all pages that have the SmartCode installed.
2. View a heatmap
Enter the URL of the page you want to analyze and select a visualization type:
- Click Heatmap — shows where users click most (hot = red/orange, cold = blue)
- Scroll Heatmap — shows how far down the page users scroll before leaving
- Move Heatmap — shows cursor movement and hover patterns
- Clickmap — shows individual click dots rather than color gradients
3. Segment your heatmap data
Filter heatmap data by device type (mobile vs. desktop), traffic source, date range, or custom segments. Mobile vs. desktop heatmaps are often wildly different — don’t skip this.
Common mistakes with VWO heatmaps
- Not waiting for enough data. A heatmap with 200 visits tells you very little. Wait for at least 1,000–2,000 sessions before drawing conclusions.
- Ignoring Safari users. Safari blocks third-party cookies by default, which can affect heatmap data. Go to Safari → Preferences → Privacy and disable “Prevent cross-site tracking” in your own browser when reviewing reports.
- Only looking at all-device aggregate. Always segment by device — a CTA that looks “cold” in aggregate might be blazing hot on mobile.
Step 4: Set Up Session Recordings
Session recordings go a level deeper than heatmaps — instead of aggregate patterns, you watch individual visitor journeys play back like a video. This is where you catch rage clicks, form abandonment, and confusing UX that no heatmap could reveal.
1. Access Session Recordings
Go to Insights → Session Recordings. As with heatmaps, recordings start automatically once SmartCode is installed and the feature is enabled.
2. Filter recordings
VWO shows each recording’s key metadata before you watch: location, device type, OS, browser, and session timing. Use filters to find recordings from specific segments — e.g., mobile users who visited your pricing page and didn’t convert.
3. Watch and add observations
Use the playback controls (bottom-left of the player) to adjust speed (1x, 2x, 4x). On the right panel, you’ll see a timeline of click events during the session. Use the VWO Chrome extension to add annotated observations with screenshots directly to recordings — useful for flagging issues to your team.
4. Connect recordings to A/B test variations
When running an A/B test, you can filter session recordings by variation. This lets you watch how users interact differently with Control vs. Variation — context that pure conversion numbers can’t give you.
Step 5: Use the VWO Event Streamer GTM Template to Send Conversion Data
This is where GTM users get a significant advantage. If you’re already tracking events in GTM’s dataLayer — things like add_to_cart, form_submit, checkout_complete — you can forward those same events directly into VWO using the official VWO Event Streamer tag template, with zero additional development work.
1. Install VWO Event Streamer from the GTM Template Gallery
Log into GTM and select your workspace. In the left menu, go to Templates → Tag Templates → Search Gallery. Search for “VWO Event Streamer” and click the result. Click Add to workspace, then Add to confirm.
2. Create a new tag using the VWO Event Streamer template
Go to Tags → New. Give your tag a descriptive name (e.g., VWO - Stream Purchase Event). Click Tag Configuration and under the Custom section, you’ll see the VWO Event Streamer template you just imported. Select it.
3. Configure the tag
The tag configuration screen gives you several options:
- Event Name: The name of the GTM dataLayer event you want to forward to VWO (e.g.,
purchase) - Exclude Events: Optionally exclude specific events from being forwarded
- Exclude Properties: Optionally exclude specific event properties from being sent
- Nested JSON Field Mapping: For events with nested JSON values in the dataLayer — click “Add Nested Field Mapping” and specify the property name and JSON path
4. Set your trigger
Scroll down to Triggering and add a trigger. Use a Custom Event trigger that fires on the specific dataLayer event name you want to stream — for example, a Custom Event trigger with the event name set to purchase.
// Example: Your dataLayer push that the Event Streamer will pick up
window.dataLayer = window.dataLayer || [];
window.dataLayer.push({
  event: 'purchase',
  transaction_id: 'T-12345',
  value: 59.99,
  currency: 'USD'
});
5. Save and publish your GTM container
Click Save, then submit and publish your GTM container. VWO will now receive the event every time it fires on your site.
6. Use the event as a metric in VWO
Back in VWO, when setting up or editing an A/B test, you can now select the streamed event as a conversion metric. Under Metrics (Data360) or Goals, look for the custom event name you’ve been streaming — it will appear as an available option once VWO has received at least one instance of the event.
Using a Custom dataLayer Variable Name
By default, the VWO Event Streamer reads from the standard GTM dataLayer variable. If your site uses a custom dataLayer variable name, you’ll need to update this in the template code:
- Go to Templates → Tag Templates → VWO Event Streamer → Code
- Find the line
const DATALAYER_VARIABLE_NAME = "dataLayer"and replace"dataLayer"with your custom variable name - Go to Permissions → Accesses global variables → Add key, enter your custom variable name, select Read, and click Add
- Save the template
Step 6: Connect VWO to GTM for Audience Targeting (Optional but Powerful)
The Event Streamer pushes events from GTM to VWO. You can also go the other direction: use GTM Data Layer variables to control who gets targeted in your VWO campaigns.
To enable this, go to Configurations → Integrations in your VWO dashboard, search for Google Tag Manager, and connect it. Once integrated, you can create campaign audience segments using GTM Data Layer conditions — for example, only show a variation to users who have a specific cart value stored in the dataLayer, or who triggered a specific GTM event earlier in their session.
This is especially useful if you’re running personalization campaigns or want to target re-engagement tests at users who’ve already interacted in a specific way on your site.
Common Mistakes to Avoid
Installing SmartCode via GTM for A/B tests. VWO explicitly advises against this — async tag loading causes flicker and timeouts. Use direct <head> installation for the SmartCode. GTM is fine for the Event Streamer and other supplementary tags.
Running tests without enough traffic. A/B tests require statistical significance to be trustworthy. Don’t call a winner at 100 conversions — use VWO’s built-in significance calculator or wait until you hit at least 95% confidence.
Sending the VWO Event Streamer on a non-Data360 account. The Event Streamer only works with Data360-enabled accounts. If you’re on the Starter plan, you’ll need to upgrade or use the older manual GTM integration approach instead.
Not verifying SmartCode is on all pages. Heatmaps and session recordings only collect data on pages where SmartCode is present. Always run the SmartCode Checker after new page templates are deployed.
Interpreting heatmaps without segment context. Aggregate heatmap data blends together very different user behaviors. Always compare mobile vs. desktop and segment by relevant audience attributes before acting on heatmap insights.
Wrapping Up
VWO is one of the most capable platforms in the CRO space — and when paired with GTM, it gets even more powerful. The VWO Event Streamer in particular is an underutilized gem: if you’re already tracking conversions in GTM for GA4, you’re two minutes away from those same events driving your A/B test metrics in VWO.
Here’s the quick summary of what we covered:
- Install VWO SmartCode directly in
<head>(not via GTM) and verify with the SmartCode Checker - Create an A/B test using VWO’s visual editor, set traffic allocation and a success metric
- Enable heatmaps under Insights → Heatmaps and segment by device for meaningful insights
- Use session recordings to watch individual user journeys and find qualitative issues
- Install the VWO Event Streamer from the GTM Template Gallery to forward dataLayer events into VWO Data360
- Optionally integrate VWO with GTM for Data Layer-based audience targeting in campaigns
If you haven’t tried VWO yet, grab your free 30-day trial here — no credit card required. It’s the fastest way to see what your users are actually doing and start running tests that move the needle.
Questions about the GTM setup or getting VWO integrated with your GA4 stack? Reach out to the Ryker Analytics team — we help businesses get their CRO and analytics infrastructure running right.