

Why this matters
Google Ads conversion tracking tells you which campaigns, ad groups, and keywords are actually driving results. Without it, you are bidding blind. This guide walks you through the correct way to implement Google Ads conversion tracking using Google Tag Manager, including tag, trigger, and variable naming conventions that scale cleanly as your account grows.
Prerequisites
- A Google Ads account with at least one active campaign
- Google Tag Manager container published on your site
- A defined conversion action created in Google Ads (e.g., Purchase, Lead Form Submit)
- Access to your site’s confirmation or thank-you page
- The Conversion ID and Conversion Label from Google Ads
Step 1: Create the conversion action in Google Ads
Before touching GTM, you need to create the conversion action inside Google Ads. This is where your Conversion ID and Conversion Label live.
- Go to Goals in Google Ads. In the left nav, click Goals, then Conversions, then Summary.
- Click the blue + button to create a new conversion action.
- Select “Website” as the conversion source.
- Choose your conversion category. For an ecommerce purchase, select Purchase. For a lead form, select Submit lead form. Match this as close as possible to what actually happened. If prompted, select to create a conversion “Manually with code”.
- Name your conversion action clearly. Use a name that maps to the event, such as Purchase or Lead Form Submit. This shows up in your Google Ads reporting, so keep it clean.
- Set the value. If order values vary, select Use different values for each conversion. This lets you pass dynamic revenue data from GTM later.
- Save and continue. On the next screen, choose Use Google Tag Manager.
- Copy your Conversion ID and Conversion Label. You will need both in GTM. They look like this: ID is a number such as
123456789, Label is a string such asAbCdEfGhIjKlMnOp.
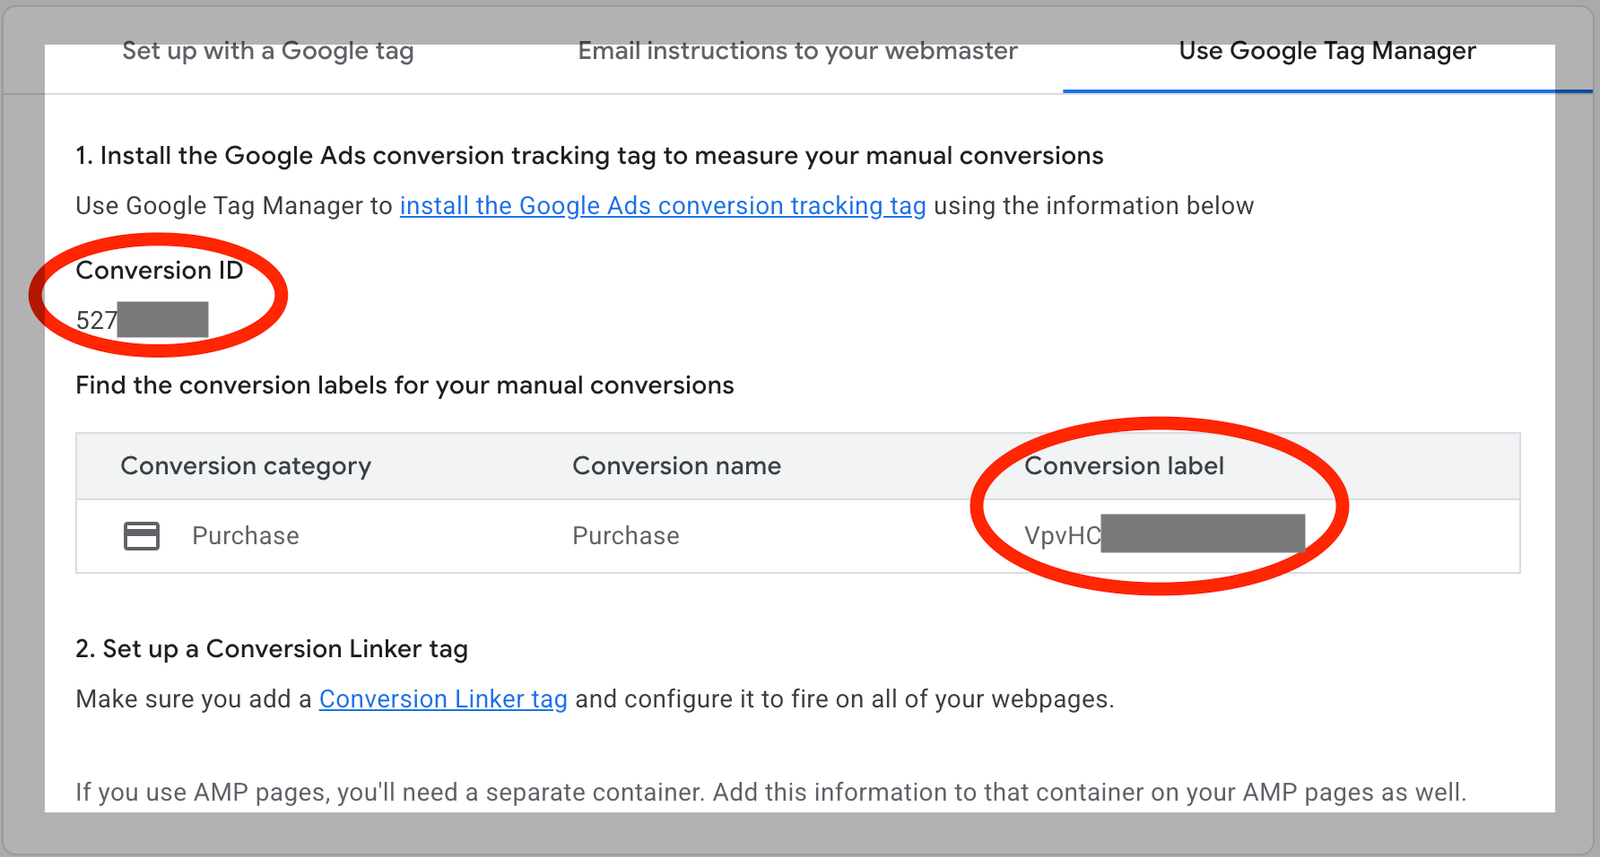
Do not close this screen until you have noted both values.
Step 2: Create GTM variables for your conversion data
Variables store the dynamic values your tag needs: conversion value, transaction ID, and currency. Create these before building your tag.
Variable 1: DLV – transaction_id
- Variable type: Data Layer Variable
- Data Layer Variable Name:
ecommerce.transaction_id - Name it: DLV – transaction_id
Variable 2: DLV – value
- Variable type: Data Layer Variable
- Data Layer Variable Name:
ecommerce.value - Name it: DLV – value
Variable 3: DLV – currency
- Variable type: Data Layer Variable
- Data Layer Variable Name:
ecommerce.currency - Name it: DLV – currency
The naming prefix DLV stands for Data Layer Variable. This prefix makes it immediately clear where the variable is pulling its value from when you are scanning a long variable list in GTM.
⚠️If your site pushes transaction data using a different key structure (for example, some platforms use transactionId or revenue instead of the GA4-style ecommerce object), adjust the Data Layer Variable Name to match what your site actually pushes. Check your data layer in GTM Preview before assuming.
Step 3: Create the trigger
The trigger controls when your Google Ads tag fires. If you already have a GA4 purchase tag using a Custom Event trigger on the purchase event, reuse that same trigger. There is no need to create a duplicate.
If you do not have one yet, create it now:
- In GTM, go to Triggers and click New.
- Select Custom Event as the trigger type.
- Set the Event Name to
purchase(This name may vary depending on your website but this is the standard). - Leave it set to fire on All Custom Events unless you need to restrict it further.
- Name the trigger: CE – purchase
The prefix CE stands for Custom Event. Consistent prefixes mean you can filter your trigger list instantly and know exactly what type of trigger you are looking at without opening it.
Step 4: Build the Google Ads conversion tag
- In GTM, go to Tags and click New.
- Click Tag Configuration and select Google Ads Conversion Tracking.
- Fill in the fields as follows:
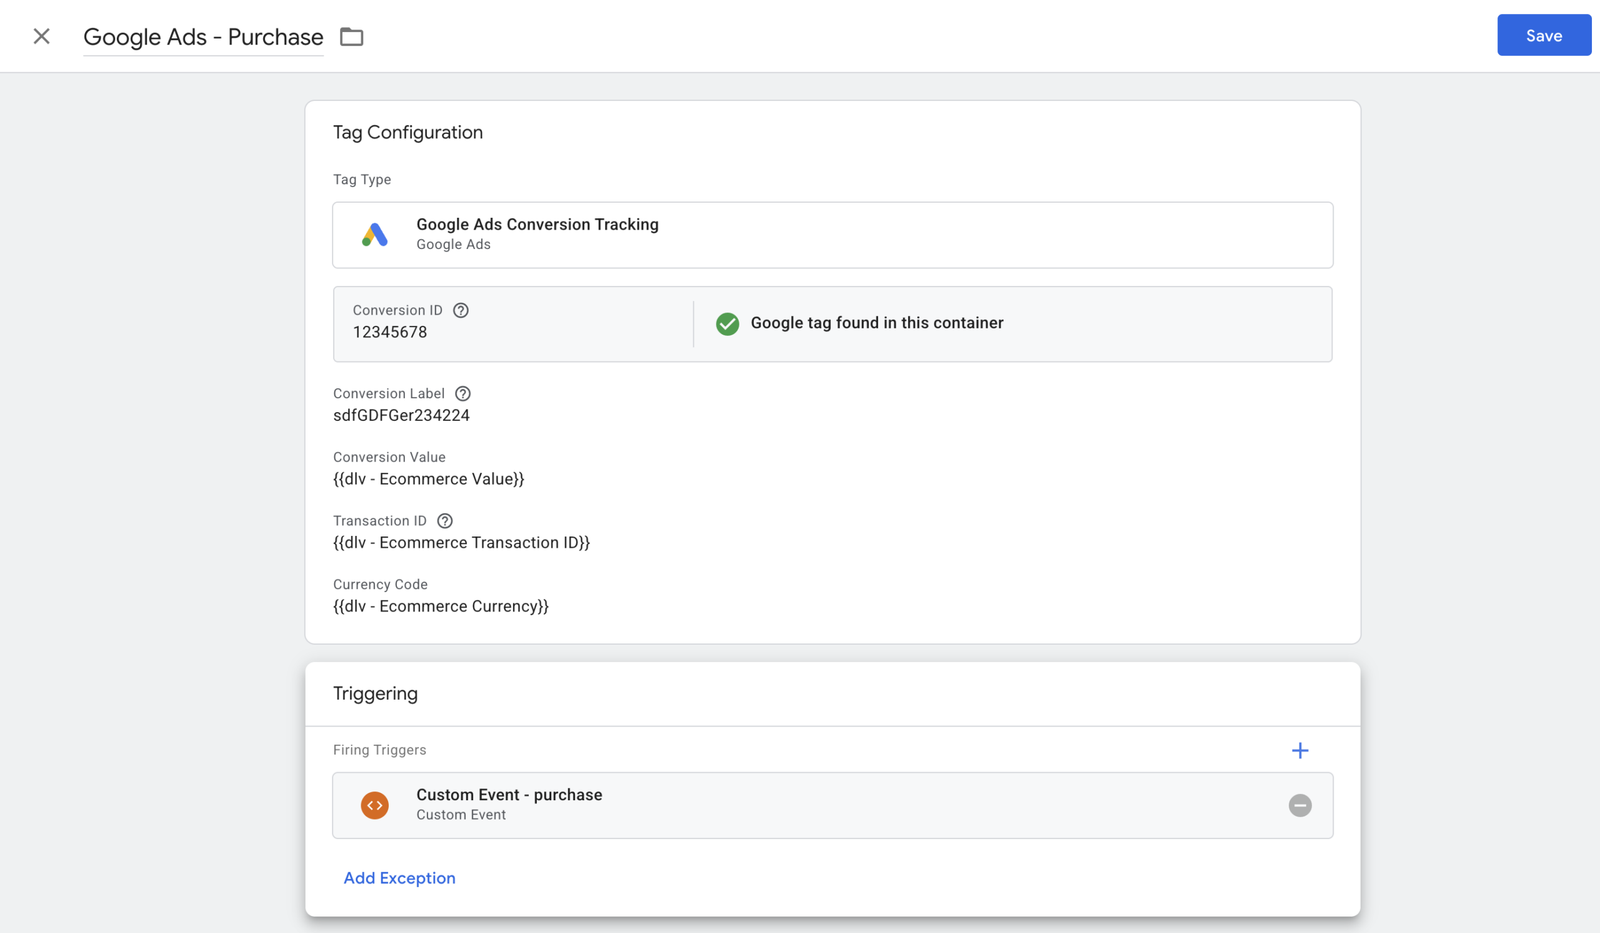
- Under Triggering, select CE – purchase.
- Name the tag: Google Ads – Purchase
- Save the tag.
The tag name format Google Ads – [Conversion Action] makes it easy to scan your tag list and immediately know which platform and which event each tag handles. If you add more conversion types later (such as a lead form), they follow the same pattern: Google Ads – Lead Form Submit.
Step 5: Verify in GTM Preview mode
- Click Preview in the top right of GTM.
- Enter your site URL and click Connect.
- Complete a test purchase on your site (use a test order or a low-value product in a dev environment).
- In the GTM debug panel, click on the purchase event in the left sidebar.
- Under the Tags tab, confirm Google Ads – Purchase appears under Tags Fired.
- Click the tag to expand it and confirm the conversion value, order ID, and currency are all populated correctly. If any show as
undefined, your data layer variable name does not match what the site is pushing. Check the Data Layer tab in Preview to see the exact key structure.
Do not publish until every field is populated with real values, not undefined.
Step 6: Publish and verify in Google Ads
- Once Preview mode confirms the tag is firing correctly with populated values, click Submit in GTM.
- Add a meaningful version name such as Add Google Ads purchase conversion tag.
- Click Publish.
- In Google Ads, go to Goals > Conversions > Summary. Your conversion action status will initially show as Unverified. After a real conversion fires, it will move to Recording conversions. This can take up to 24 hours.
For faster verification, use the Google Tag Assistant Chrome extension on a live test transaction to confirm the gtag hit is being sent with the correct conversion ID and label.
What your data layer push should look like
For the variables you created in Step 2 to have data to read, your site needs to push a purchase event to the data layer on the order confirmation page. A standard push looks like this:
window.dataLayer = window.dataLayer || [];
window.dataLayer.push({
  event: 'purchase',
  ecommerce: {
    transaction_id: 'T-12345',
    value: 49.99,
    currency: 'USD'
  }
});
This push needs to happen before GTM fires, which means it should sit in the page source of the confirmation page, not loaded asynchronously after GTM. If your platform handles this through a plugin (WooCommerce, Shopify, etc.), confirm that the data layer push includes these exact keys and that it fires on the order confirmation page specifically.
Common mistakes
Using a Page View trigger instead of a Custom Event trigger. Some guides tell you to fire your conversion tag on the thank-you page URL. This works, but it breaks down the moment your URL structure changes, and it can double-count if someone refreshes the confirmation page. The Custom Event trigger on purchase is more reliable because it fires only when the transaction is explicitly pushed to the data layer.
Hardcoding the conversion value. If you set a fixed value in the tag instead of pulling from the data layer, every conversion will report the same revenue in Google Ads. That makes your ROAS data meaningless. Always pass dynamic value.
Forgetting the Order ID field. Leaving Order ID blank means Google Ads cannot deduplicate conversions. If the same order is counted twice (page refresh, back-button, etc.), your conversion numbers inflate. Pass the transaction ID.
Using the AW- prefix in the Conversion ID field. GTM’s Google Ads Conversion Tracking tag type expects just the numeric ID, not the full AW-123456789 string. Paste only the numbers.
Not checking data layer variable values in Preview. Publishing before verifying that your variables are populated with real values is the most common reason conversion tracking silently fails. Always open the tag in Preview, expand it, and confirm every field shows an actual value.
Need help getting this set up correctly?
At Ryker Analytics, we implement and audit Google Ads conversion tracking for businesses that need their data to be accurate before they scale spend. If your conversion status is stuck on Unverified, or you want a full audit of what is and is not firing, get in touch.