
What is Google Analytics 4 and why do you need it?
Google Analytics 4 (GA4) is Google’s current web analytics platform. It replaced Universal Analytics in 2023 and it’s what you’ll be setting up today. At its core, GA4 tracks who’s visiting your website, where they’re coming from, what they’re doing, and whether they’re converting.
If you’re running a website and you don’t have GA4 installed, you’re flying blind. You have no idea what’s working, what’s not, or where people are dropping off. Setting up a GA4 account is the very first step toward making data-informed decisions.
If you’ve used Google Analytics before, GA4 looks and works differently from the old Universal Analytics (UA). It’s event-based rather than session-based, which makes it more flexible for tracking modern user behavior across web and app. If you have an old UA property somewhere, it’s no longer collecting data — you need GA4.
✋ What you’ll need before you start
- A Google account (Gmail works fine)
- Your website URL
- About 10 minutes
📌 Before you continue: Make sure you’re signed into the Google account you want to own this property long-term. Use a business Google account if you have one — not a personal Gmail you might lose access to.
Step 1: Go to Google Analytics and create an account
Head to analytics.google.com and sign in with your Google account.
- Click “Start measuring”
If this is your first time in GA4, you’ll land on a welcome screen. Hit Start measuring to begin setup. - Name your account
Your account is the top-level container. Most businesses only ever need one account. Name it after your company. Under Account Data Sharing Settings, leave the defaults unless you have a specific reason to change them, then click Next.
Step 2: Create your property
A property is the GA4 workspace for a specific website or app. One account can hold multiple properties — useful if you manage more than one website.
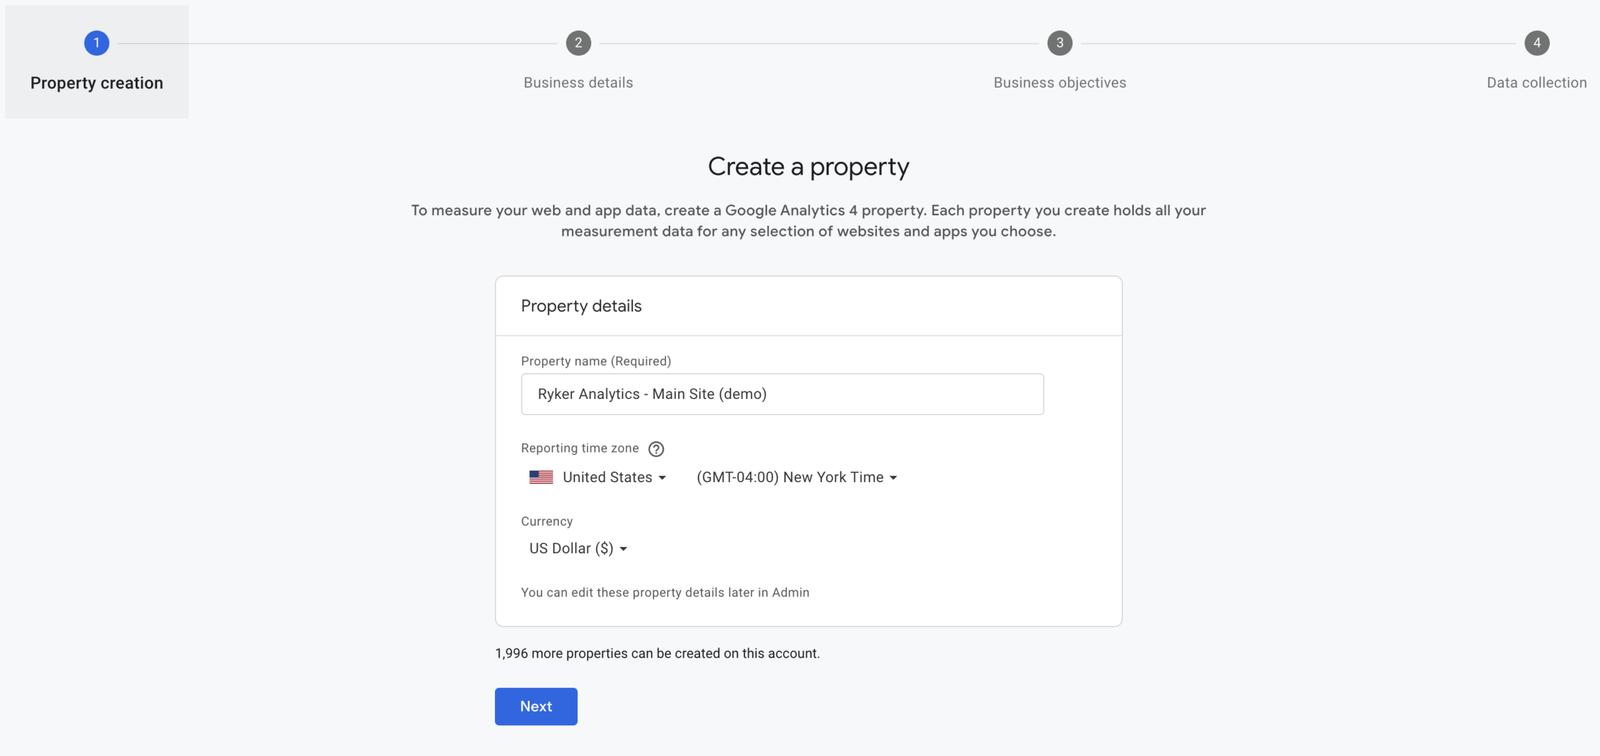
- Name your property
Use something descriptive like your website name or domain (e.g. “Ryker Analytics – Main Site”). This makes it easy to identify if you ever have multiple properties. - Set your reporting time zone and currency
Set these to match where your business operates. This affects how your data is reported. Getting the time zone wrong means your daily session counts will be off — sessions that happen near midnight may be split across two days incorrectly. - Click Next
You’ll be asked a few questions about your business category and size. Answer them and click Next again. These answers don’t affect your data — they just help Google surface relevant reports for you and can always be adjusted later.
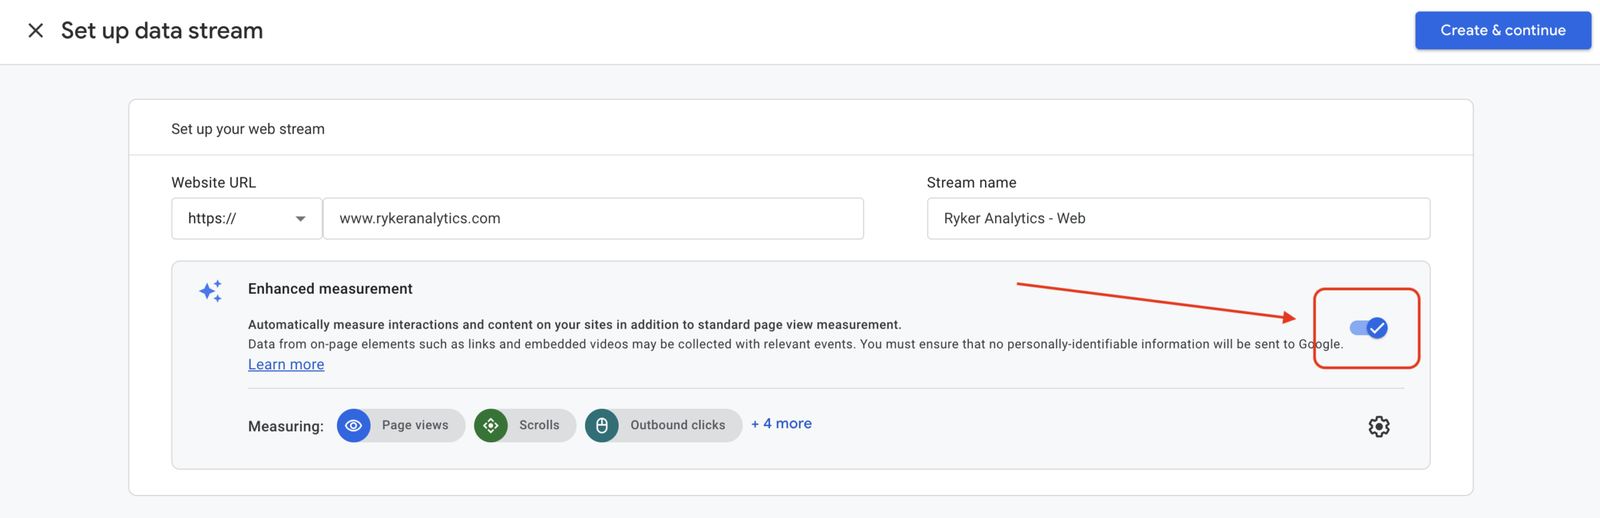
Step 3: Set up your data stream
A data stream is how GA4 actually receives data from your website. Think of it as the pipe between your site and your GA4 property.
- Choose “Web”
You’ll be asked to choose a platform: iOS app, Android app, or Web. Select Web. - Enter your website URL and stream name
Type in your website URL (e.g.www.yoursite.com) and give the stream a name – I prefer to append “Web” if it is a web stream. Make sure Enhanced measurement is toggled on. This automatically tracks scrolls, outbound clicks, video engagement, and file downloads without any extra configuration. - Click “Create stream”
GA4 will generate your data stream and show you your Measurement ID. It looks likeG-XXXXXXXXXX. Copy this and keep it somewhere handy — you’ll need it when you install GA4 on your site whether you install it via Google Tag Manager or directly on your site.
Step 4: Install GA4 on your website
Having a GA4 property doesn’t mean it’s tracking yet. You still need to put the tracking code on your site. GA4 will prompt you to do this right after creating your stream — you have a few options.
- Install via Google Tag Manager (recommended)
If you’re using or planning to use GTM, this is the right path. You don’t paste any code directly — you set up a GA4 Configuration tag inside GTM using your Measurement ID. We cover this step-by-step in our GTM + GA4 setup guide. - Install the global site tag directly
GA4 will show you a code snippet. Copy it and paste it into the<head>of every page on your site.
🟢 On WordPress? Use a plugin like “Insert Headers and Footers” or “WPCode” to add the snippets without editing theme files directly.
🟢 On Shopify? add to
theme.liquid.🟢 On Squarespace? Settings > Advanced > Code Injection.
- Use a CMS integration
Some platforms have native GA4 integrations. Squarespace, Wix, and Webflow all let you paste your Measurement ID directly into their analytics settings without touching any code.
Step 5: Verify data is coming in
Don’t assume it’s working. After installing the tracking code, confirm GA4 is actually receiving data before moving on.
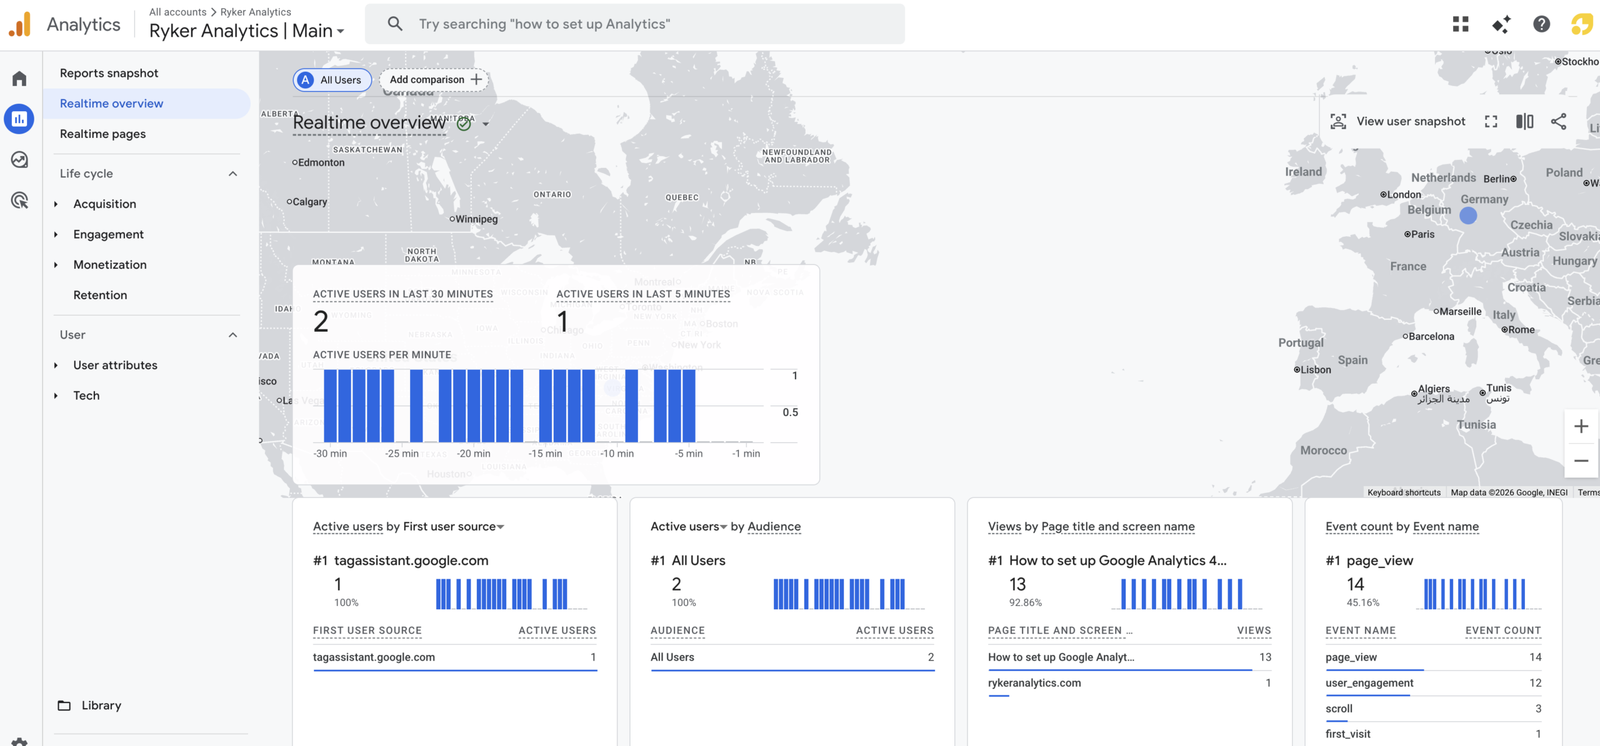
Option A: GA4 Realtime report
In GA4, go to Reports > Realtime. Open your website in a separate browser tab and navigate around. Within 30 seconds you should see yourself appear as an active user. If you do, you’re live.
Option B: Google Tag Assistant
Install the Google Tag Assistant Chrome extension. Visit your site and it will confirm whether your GA4 tag is firing and flag any issues it detects.
⚠️ Not seeing data? The most common causes are: the tracking code isn’t on the live version of your site (check you’re not on a staging URL), there’s a typo in your Measurement ID, or a browser ad blocker is interfering with your test. Try in an incognito window without extensions.
Common mistakes to avoid
❌ Creating multiple properties for the same site
It’s easy to accidentally click through setup twice and end up with duplicate properties. Check your account before creating a new one — if a property already exists for your domain, use that one instead of creating another.
❌ Wrong time zone on the property
This is a quiet one that causes real headaches later. If your time zone is set incorrectly, your daily reports won’t align with your actual business day. Set it correctly from the start — changing it later affects historical data display.
❌ Installing GA4 twice
If you install the tracking code directly on your site and also fire it through GTM, you’ll double-count every visit. Pick one method. If you use GTM (recommended), make sure there’s no GA4 snippet hardcoded in your site’s HTML.
❌ Skipping Enhanced Measurement
Enhanced Measurement is toggled on by default when you create a data stream — don’t turn it off. It automatically captures scroll tracking, outbound link clicks, file downloads, and more, all without writing a single line of extra code.
❌ Using a personal Google account
If the GA4 property is tied to a personal Gmail and that person leaves the company or loses access, so does the data. Use a business Google account or make sure multiple people have admin access from day one.
Your account is live. Here’s what comes next.
You’ve got a GA4 account set up and data flowing in. That’s the foundation. From here, the next move is getting Google Tag Manager in place so you can start tracking events — button clicks, form submissions, purchases — without touching your code every time.
After that, you can connect GA4 to Google Search Console for SEO data, link it to Google Ads for campaign attribution, and start building custom reports that actually tell you something useful.
Each of those gets its own post. If you’d rather have someone set all of this up correctly from the start, that’s exactly what we do at Ryker Analytics.